Project Arbiter
Currently developed in the Unity Game Engine using C#.
Phase 1 Development
Phase 1 of development for Project Arbiter was to create the foundation of which the game would be built upon. Classes, physics, player input management and save systems were heavily considered during the outlining of what I wanted to create. I was always planning to create all of my systems from nothing so that I had the ability to fix issues and weird interactions when edge case conditions are met to create a smoother player experience and have complete control over the game as a programmer. Each script can be found on Github in which I discuss in detail.
Programming Concepts
- Health System
- Damage System
- Scaling Player Stats
- Crowd Control System
- Equipment System
- Custom Player Physics
- Player Input Management/Keybindings
- Save System
- Gameplay Options Menu
- Cinematic Camera System
- Dialogue System
Health System
The health system was created in one Monobehavior script called EntityHealth.cs and one namespace class called HealthClasses.cs. This is designed to interact with the damage system which is explained under the damage system section. Inside of the HealthClasses.cs script Project Arbiter has different health types that can bonuses by damaging a health bar with a specific damage type. I used an enum in order to create different health bar types to check for in the damage system. I created a class called “Health Property” with a constructor and it contains 3 elements: Health Type, Health Cap and Current Health Value. There also is a healing class called “Healing Property” that has an Entity Target Type which determines whether an enemy or the player should receive the healing, Health type to heal and the amount of healing to be given. The script that does the action of healing is in the DamageClasses.cs script which handles all health events. The function under the class “CallHealthEvent” is called “SendHealingEvent”. This properly sends healing to the entity’s appropriate health bar to its matching health type. Further details can be seen through the scripts on Github.
Damage System
The damage system is far more complex than the healing system is. The damage system interacts with entities via different classes and scripts such as: DamageClasses.cs, EntityHealth.cs, StateClasses.cs, EntityStats.cs, StatClasses.cs. These all do different things and are all important to allow damage to scale with stats, buffs, debuffs, crowd control effects and player equipment such as armor, weapons, etc. Stats will be explained in more detail in the next section. Damage instances are stored via the DamageProperty class which stores many different parameters including a constructor but, has no overloads in order to reduce complexity. I'll outline what is held in a DamageProperty by showing this image here.
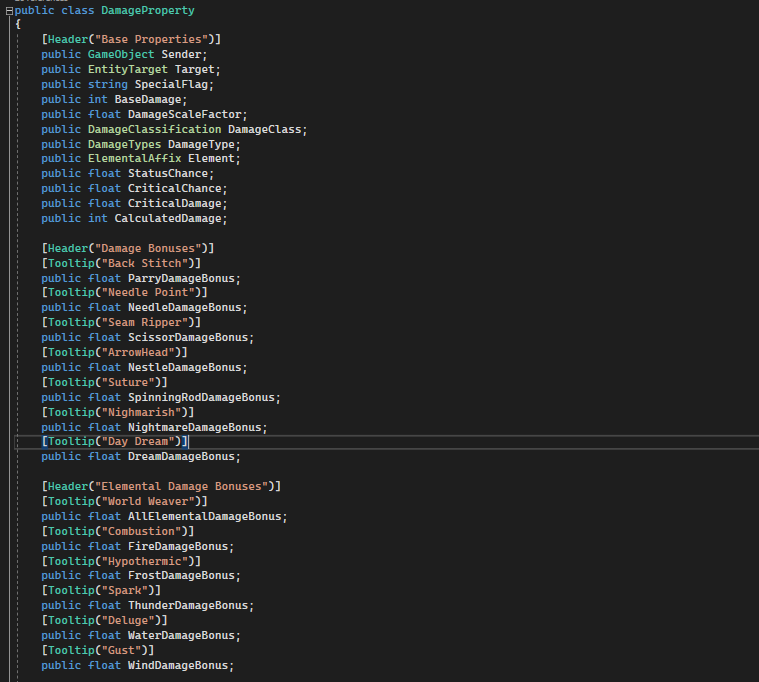 As you can see there's many parameters and a constructor.
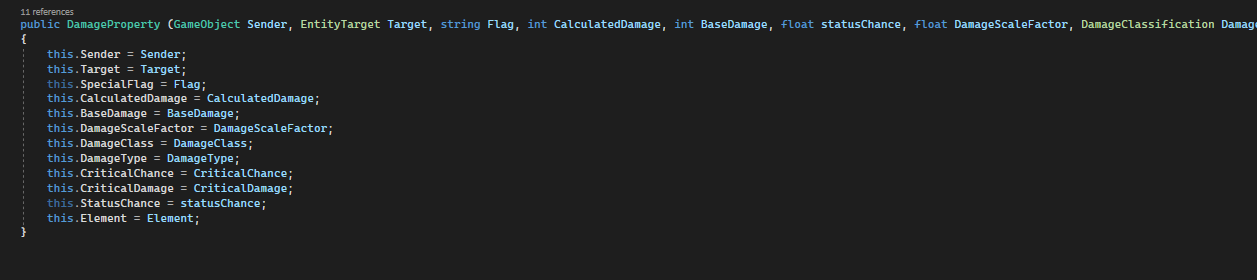
An Instance of damage is created by using DamageProperty and then called within the function in the DamageClasses.cs script through the CallHealthEvent.SendDamageEvent. Depending on the entity type it gathers the stats different and applies them all to the stats you saw such as elemental damage bonuses, damage bonuses and critical damage related stats. Damage types are also important and have certain health bar types which are more effective than others. Cut Damage from your scissors slices through armor easier then piercing damage from your needle for an example. After the damage bonuses are set then the damage calculations begin. A private function known as “Calculate Damage” is called. This interacts with the health class in order to reduce the health of the entity. States such as being under certain elemental effects can cause other bonuses to apply which is why states are checked which will be explained in greater detail under the crowd control section. This acts a calculator that handles all of the rules of damage within the game that I have come up with. Stats depending on the entity type being player or enemy grabs from stat sheets and applies those bonuses including active buffs to the attack. See the script for more details on Github.
Scaling Player Stats
Stats all have special names which I themed after sewing. Stats are stored in their unique classes called “PlayerStatMap” or “EnemyStatMap” in the StatClasses.cs script. These also interact with the equipper and Inventory script because currently equipped items grant stats and must be accounted for. Inventory script is simple and effective. It stores classes as objects in lists. There are many objects that are stored in different lists and so its best to leave that detail to be seen in the actual script which can be viewed on github. Each item despite major differences has a name, a quantity, in some cases an item level, Item type and the model of the object. There many other parameters but those are more specific to the item type such as armor, skills and weapon information stored differently. Within the “Player Stat Map” and “Enemy Stat Map” in the StatClass.cs script it carries a long list of stats which are calculated in real-time from items being equipped/unequipped, buff/debuffs and your weapon in the EntityStats.cs script. Additionally, collectable items in the game exist that grant permeant stat increases much like a Heart Container in the legend of Zelda. These are also factored into being calculated. Please see these scripts for more details on Github.
Crowd Control System
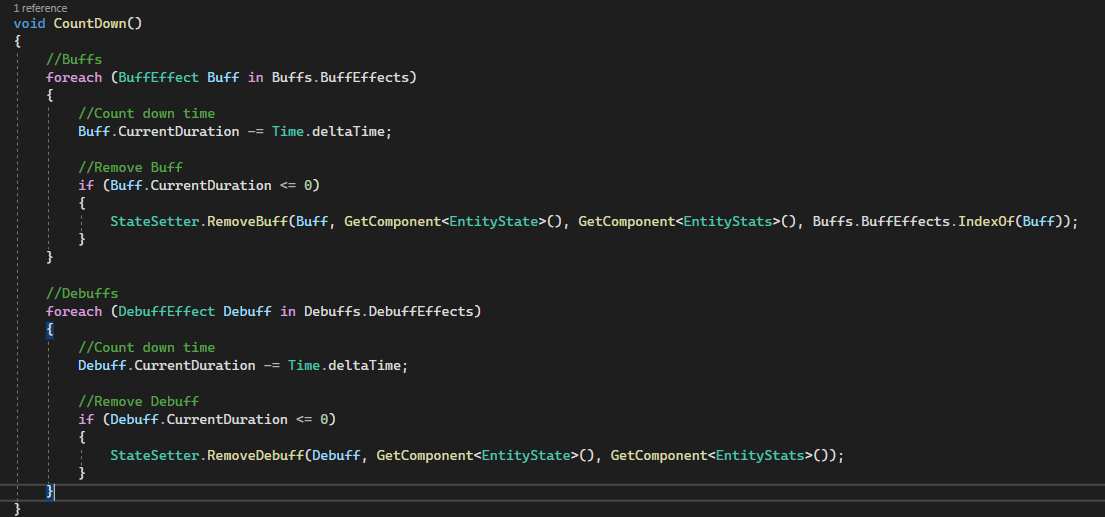
Changes to the state of the player such as debuffs, buffs or crowd control effects are all handled within two scripts. EntityState.cs is used at runtime to countdown the timers of the durations of all effects and cleanse their effects respectively once they have expired. I used loop and iterative functions in order to countdown each buff seen here.
The more complicated calculations are handled within the second script StateClasses.cs which handles all of the classes in which crowd control, debuffs and buffs derive from. I created a function to handle all 3 of these classes separately. The classes they derive from are “Buff Effect” and “Debuff Effect”.
 The “Debuff Effect” class has many overloads because there are many ways required to create different kinds of instances of debuff effects as seen here.
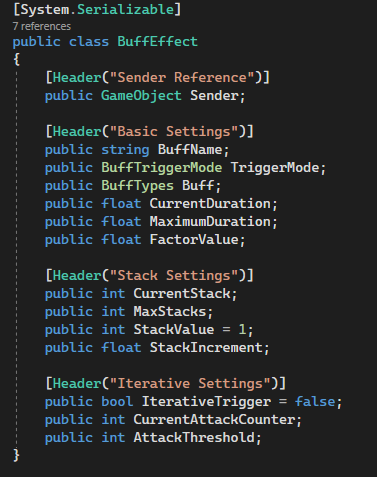
 The distinction between buffs and debuffs are not very different. They only difference is that buffs grant bonuses and debuffs reduces your bonuses to your stats or inflict some status that controls how the player can play for a short duration. An example of this is a stun, guard break or reducing your damage. There are 4 public functions that do similar things: StateSetter.SendBuff, StateSetter.RemoveBuff, StateSetter.SendDebuff and StateSetter.RemoveDebuff. They are appropriately named for the only function they perform however, there are many encapsulated private functions at work. The functions work near synonymously therefore, I will refer to debuff portion of the code and it can be treated as the same for buffs. First, there is a check for an immunity to that debuff on the entity. If so, a return function is called and the debuff attempt is rejected.
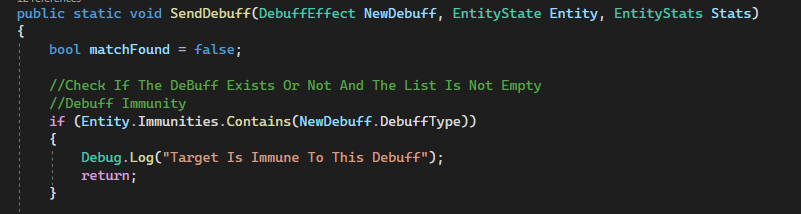 If the entity does not have an immunity then its time to determine how to apply the effect. In the previous image, a Boolean named “matchFound” is present which is determine of a matching debuff of the same name exists already on the player. This is determined by looping using a foreach in the list of debuffs on the entity through the EntityState.cs script which contains all the current status effects on the player or enemy. Foreach is used over for, because its far faster to check through each and determine if a match is found over iterating one at a time then with a for loop. If so, then the debuff isn’t added but instead refreshes the duration of the debuff extending its lifetime further and ends with a return.
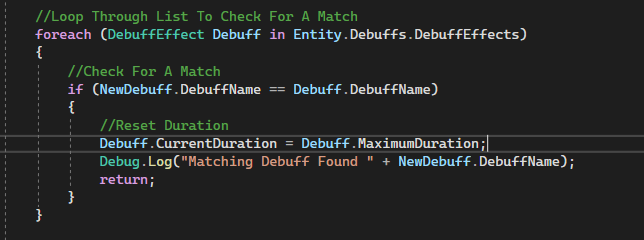 If the loop detects there isn't a match, then the next portion runs. This is where the actual work of the debuff is done seen below.
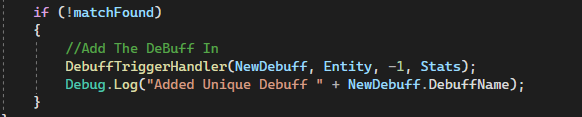 DebuffTriggerHandler() runs as a method to determine if the debuff is passive or if the debuff is tick based and must either deal some kind of damage or deal some kind of stacking effect for more complex effects for the future.
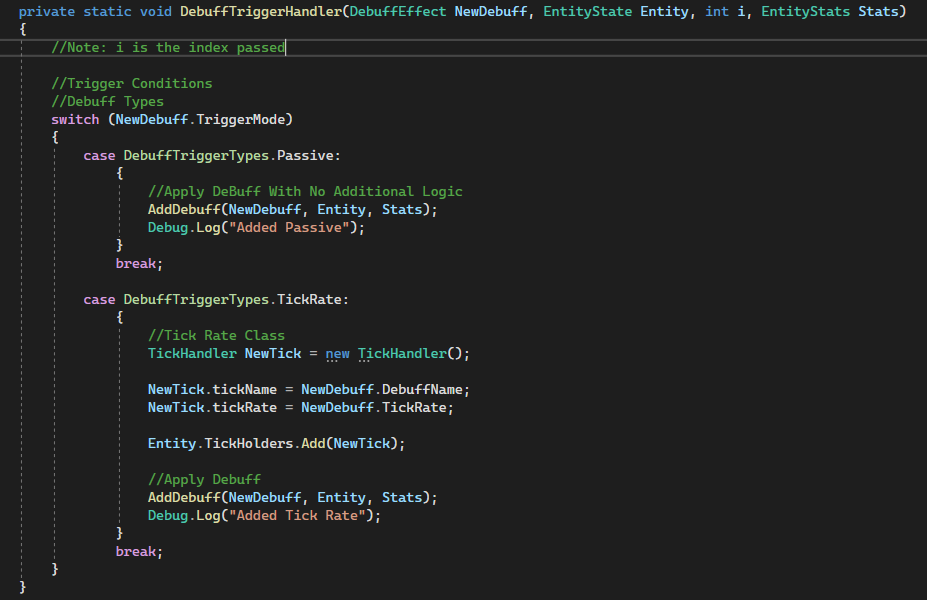 Each debuff contains a trigger mode. If it is passive it goes to the process of actually being added to a list on the entity. If its tick based then it gets set with its unique tick rate and a copy of the same name to a separate list on EntityState.cs called “Tick Holder”. These holders are used to give custom tick rates to overtime effects. The following is the class contained by the list “Tick Holder”.
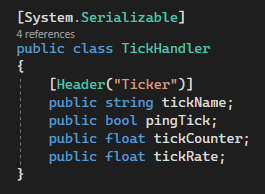 The other settings are set via the debuff. The counter is a clock to ping each tick when reached by the rate over time and will flag the pingTick Boolean true. A custom function would detect this flag and then perform a custom effect through this system. However, that will be expanded on in Phase 2 which is the combat update. Either trigger mode will result in AddDebuff to run. This is a very lengthy function, but it is not complicated. I use a switch case in order for the code to look very clean. Most of the debuff effects follow this pattern such as stun, slow, tattered and guard break for example.
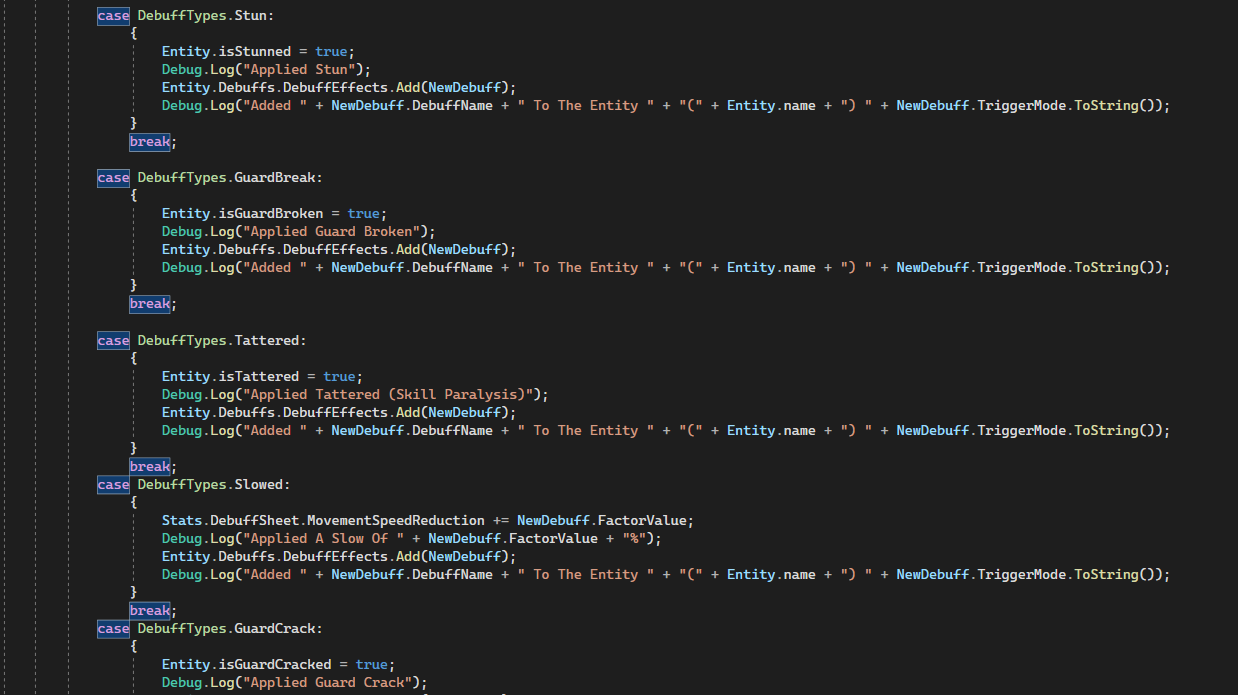 A flag on the EntityState.cs class to the corresponding debuff is turned to true and any other additional effects are applied to a debuff sheet that is on the EntityStats.cs script which derives from the class library StatClass.cs. StatClass.cs is what contains the debuff stat sheet as seen below.
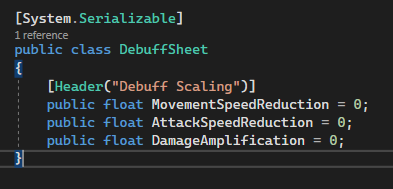 If this was a buff instead, buffs would add bonused into the BonusBuffSheet class instance on the EntityStats.cs script. All of the stats are being calculated and actively effect the player's power.
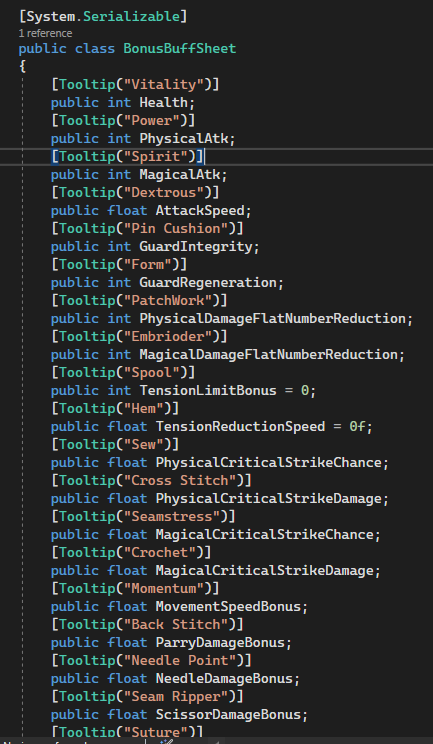 This is an example of just a few of the stats. For clarity, the tooltips show in engine when hovering over these parameters in the game editor. These are the names of all the stats above them and as you can see, they're all sewing themed. Please see the scripts on Github in this section for greater details.
Equipment System
The equipment system is a combination of Stash.cs which is your inventory, InventoryClasses.cs which handles all of the inventory logic, PlayerSettings.cs which saves all of your inventory in a local text file, Equipper.cs which holds all of your currently equipped equipment and adds to your stats directly. Your inventory can hold everything with Stash.cs, but your equipment you are holding are determined by Equipper.cs. Stash.cs is a script works very different from the previous scripts because it is a singleton. It acts a global manager that can be accessed by any other script in real-time removing dependency issues. Other examples include scripts such as PlayerSettings.cs and InputManager.cs which are also Singletons. 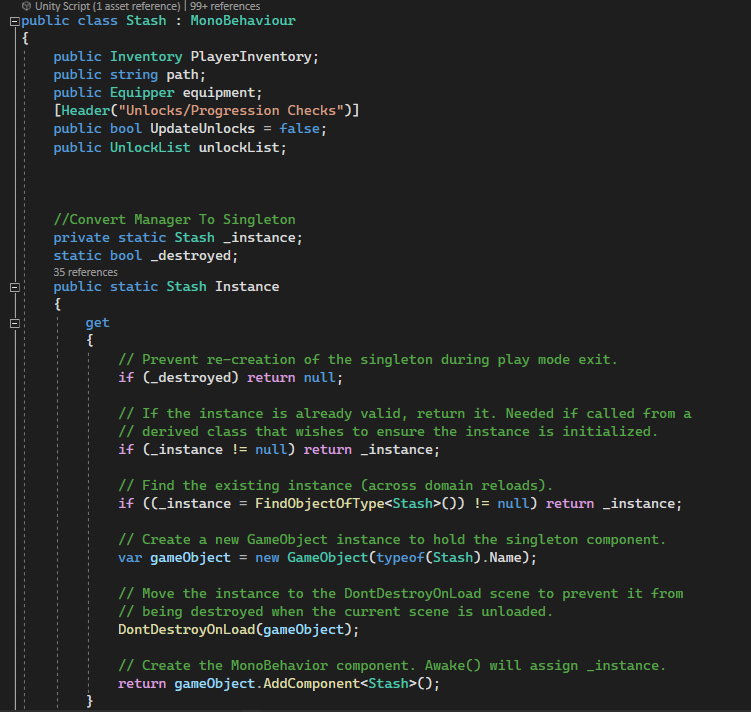
Singletons are created by allowing them to cross between loading scenes without being destroyed and also checked if there are more then one instance. I use a get, but not a set because this shouldn’t be set with anything once the game launches and runs this on a first-time startup basis seen here on the Awake method.
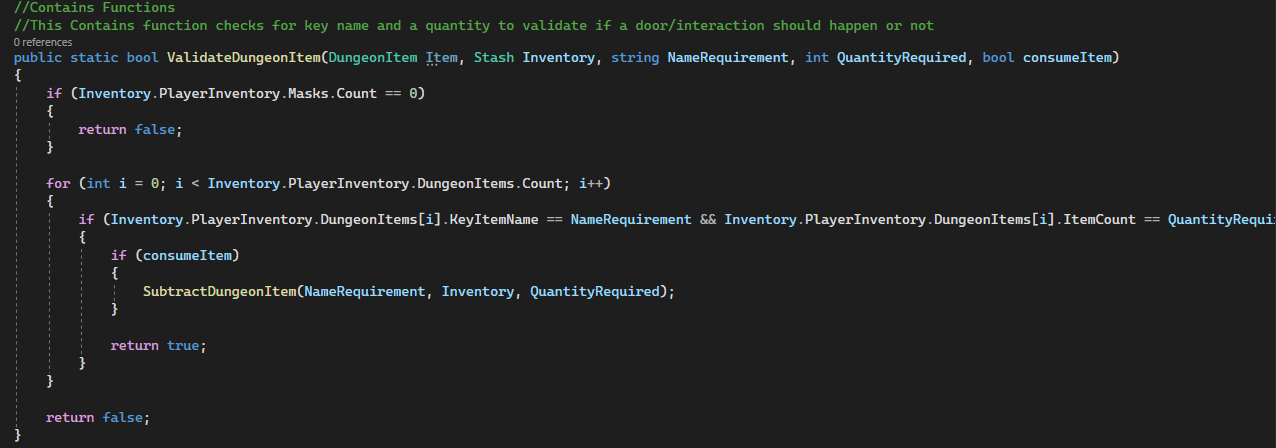
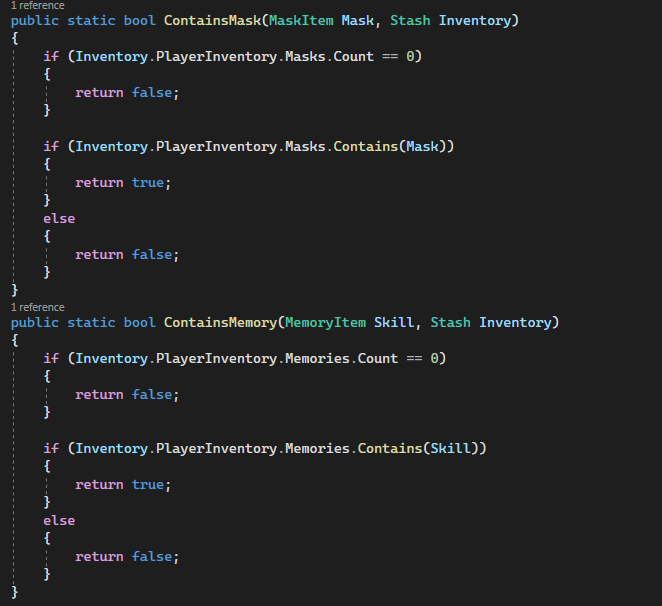
The Awake method is the first method called on startup in Unity. Unity's order of execution methods run in the order of Awake, Start, Update, Fixed Update, Late Update, OnGUI, OnDestroy. There are many others between these however, these are the main function to be aware of. This prevents singleton instantiation errors. I also, get a path to the inventory file as well at this stage and get the equipper component in order to prevent an initial null reference error. Now that the inventory is prepared to be accessed by the equipper its now important to see how the inventory system works. This a large script because I handle each item type somewhat differently and that’s for many reasons. One is for easier ways of saving inventory items. Another reason is because different items require specific things. Such as armor being different from a weapon. Or an accessory item being different from a skill. Without going to exhaustive detail there are many public classes here that need to be generally outlined. There are voids that perform functions and voids that return information about the inventory. Return information include returning item quantities as integers, returning dungeon items such as keys for doors that require specific keys, return if the item exists and return if you unlocked an ability yet or not. Additionally, there is a save system present here as well but, that will be detailed in the save system section instead. 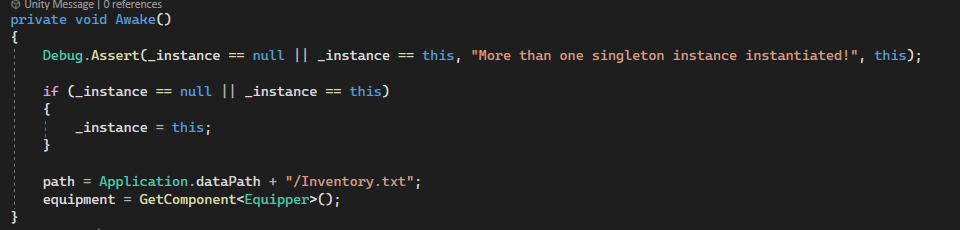
Now let’s get to the Add() and Subtract() methods. The Stash.cs script works at runtime but the current script you have seen in the last three images come from InventoryClasses.cs. Stash is the script that gets things added into its inventory instance called “PlayerInventory”. Player Inventory contains many other kinds of inventory for each item type. Collectable items such as permeant stat increase items are in one specific list, weapon inventory is held in a different list and so on for each item type that requires vastly different information to be stored and accessed at run time. Here’s a look at what the player inventory looks like. 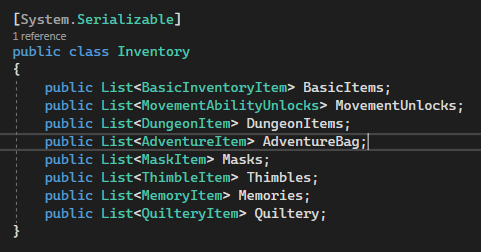
You can see “Inventory” in the script of InventoryClasses.cs is a class that holds multiple lists. Each list has a different item class that it holds. I add into these using the Add() method. However, there are more rules then that seen here which are handled different. 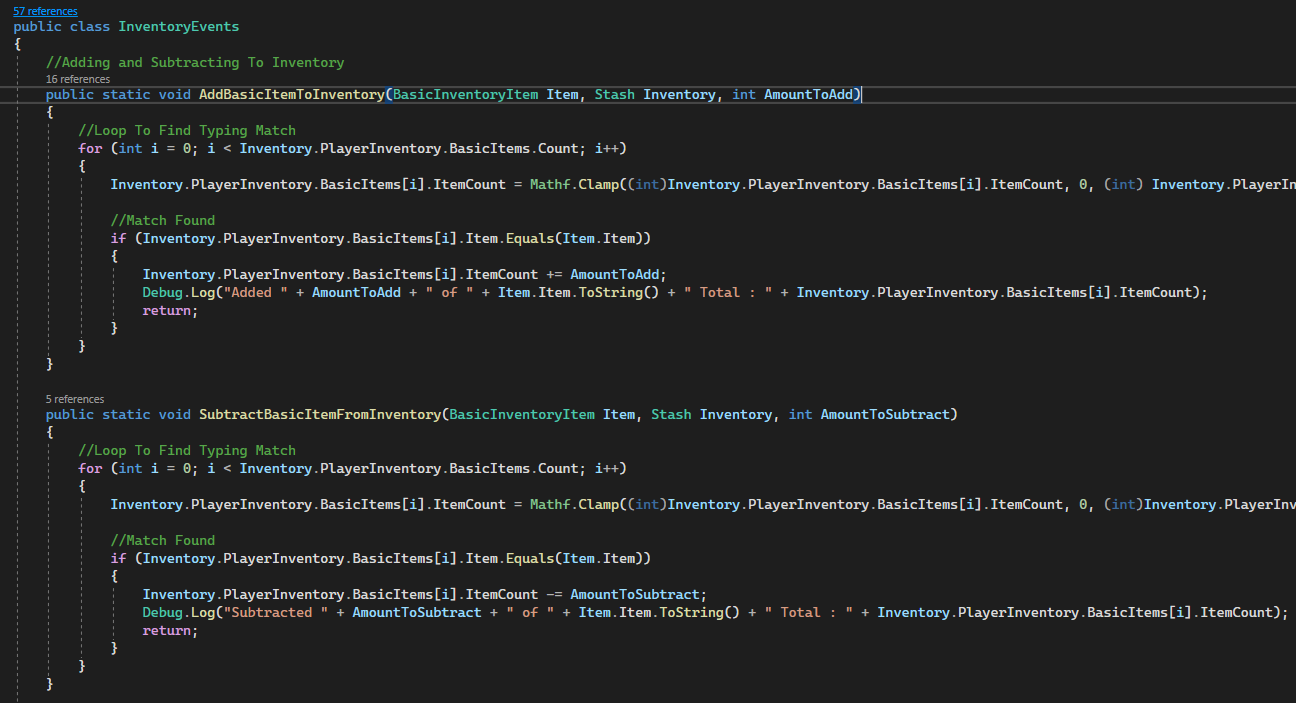
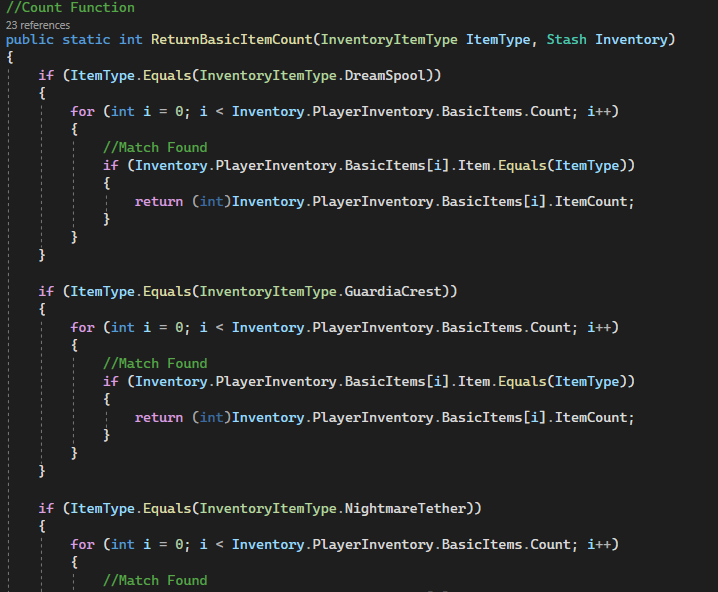
 This is called from the class InventoryEvents and in the case of basic items such as currency I have an already created instance of each corresponding itemtype in the basic item inventory list. The AddBasicItemToInventory() function and its opposite looks for the matching index using a for loop and then adding the quantity to the appropriate item type and then returning breaking out of the function as early as needed to optimize the function and reduce iterations. There are similar functions being employed with the other items. The Equipper takes advantage of these inventory functions and allows you to copy items in your inventory into your currently equipped items. It is important to note, this update was not about combat. Therefore, these things can only be done in the editor and not in game yet because, there is no UI present to display your loadout and items. In Phase 2, this will all be present and improved with more features. Equipper in phase 2 will allow you to equip skills, armor, etc. At the moment, the equipper does support spawning items to be seen on the character however, because there are no item models there is nothing to display yet. The items are calculated via this method. every time it's called.
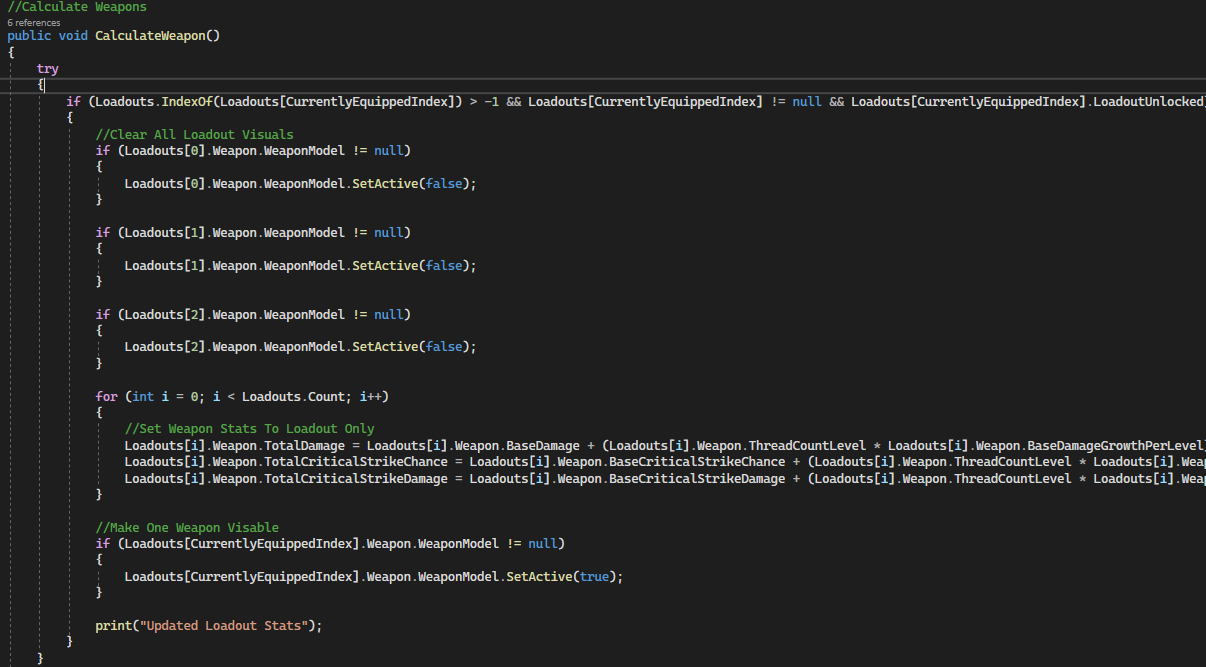
 These all call unique methods for each item type your character wears and adds them into your “Player Stat Sheet” on EntityStats.cs and its important to note equipment can be upgraded 1 level with an item that scales the power of almost every item in the game. This is why you notice a parameter called ThreadCountLevel being used inside of an UpdateStats() method. The weapon script is more complex then this. There are 4 weapons to switch between in this game, so the game only calculates the item stats of the equipped index of your weapon you are holding and not all 4 of them at once.
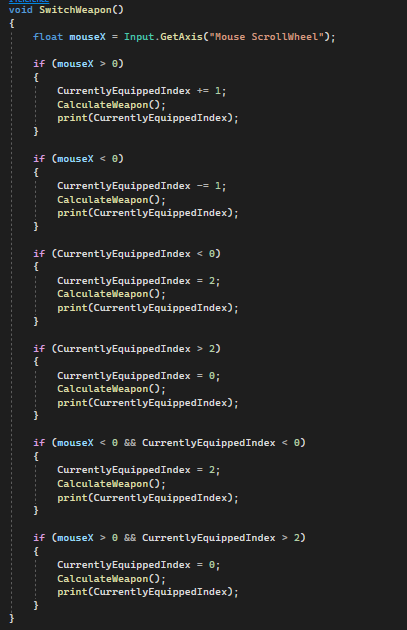
This function uses a bit of defensive programming to prevent errors. Switching weapons is done in this script via your mouse wheel.
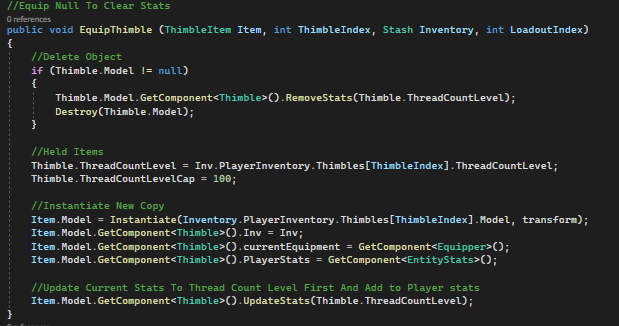
The following image is an example of equipping armor. I set its appropriate values and call an update method after determining its’ level. I grab the index of where the item is in the inventory and then add it to the equipper loadout which is now being properly calculated to the player. I then instantiate a model and set the component of “Thimble” dependencies. Each item in this game that is worn has a script attached holding its bonus stats. In this case the script is Thimble.cs. This is a one-to-one ratio for the most part with minor differences for Mask.cs (another armor item type) and Quiltery items in Quiltery.cs (accessories that grant passives and stats). Once I get farther into Phase 2 I will have models to make this system even better and attack the items to the player to be seen. This will create a great sense of progression and style to the game. 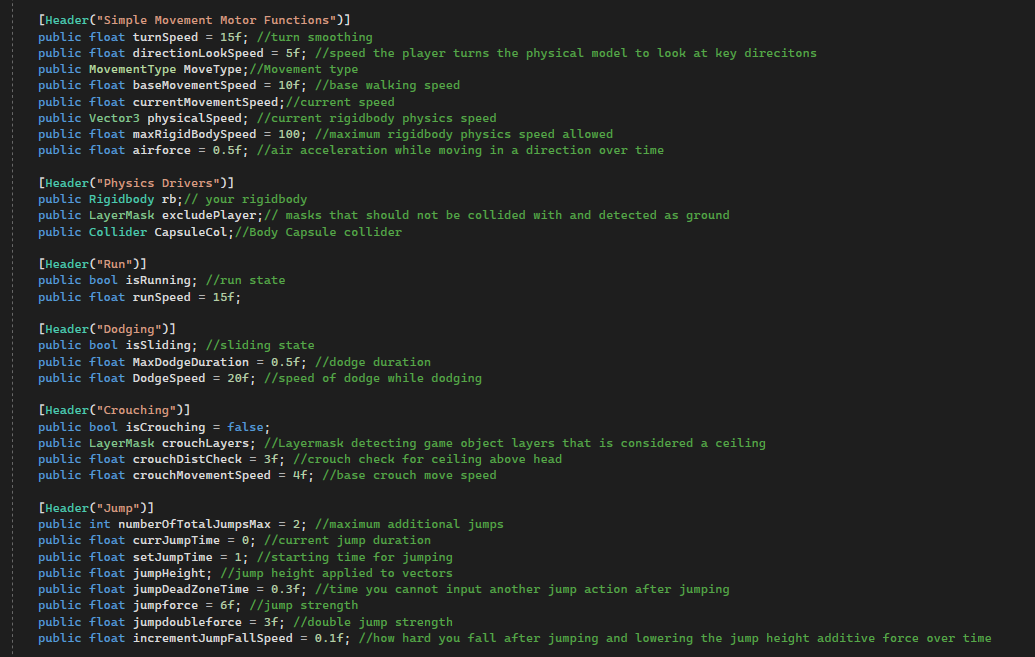
Custom Player Physics
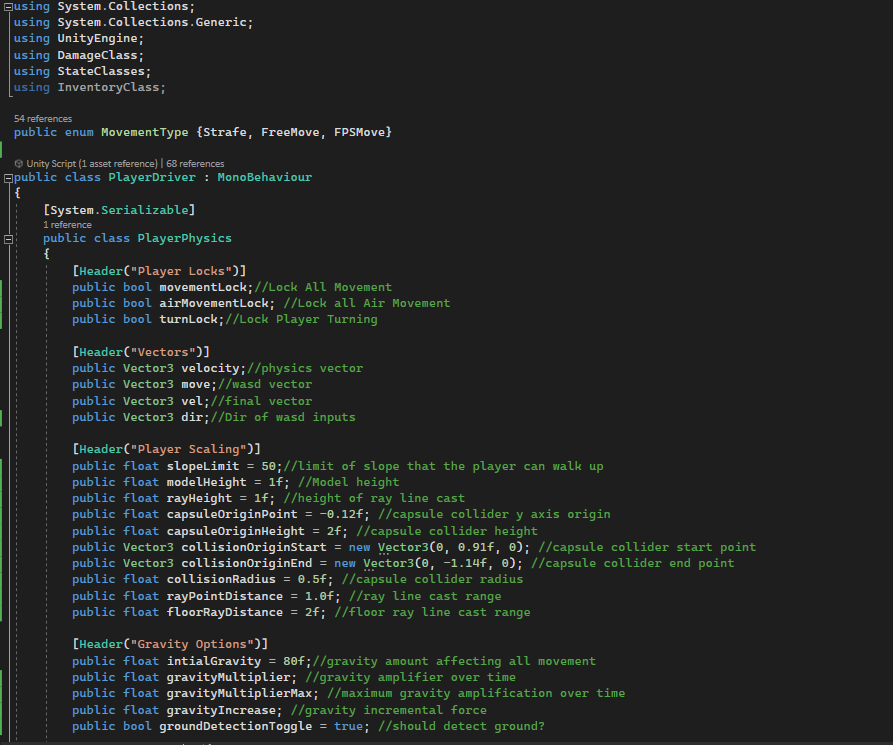
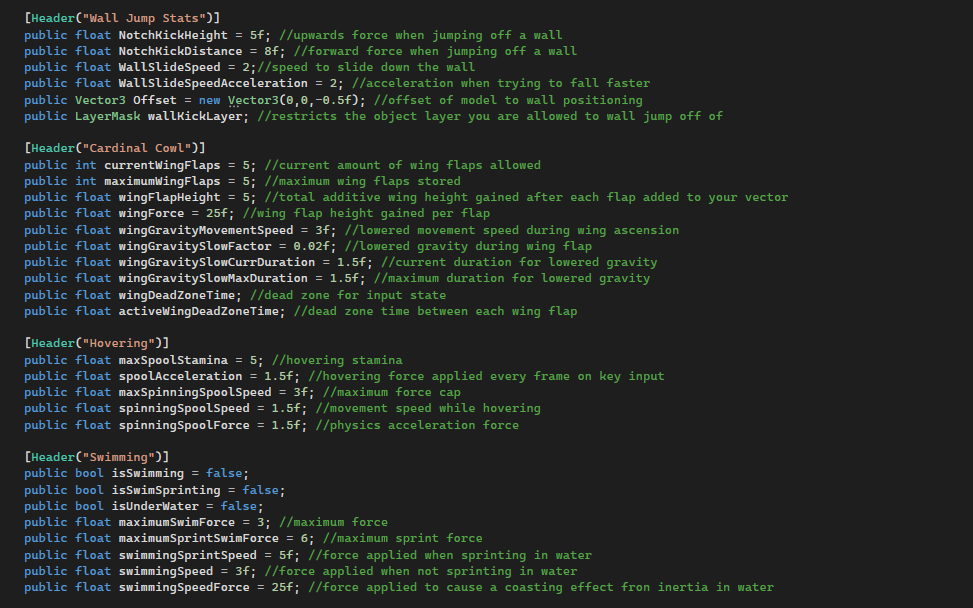
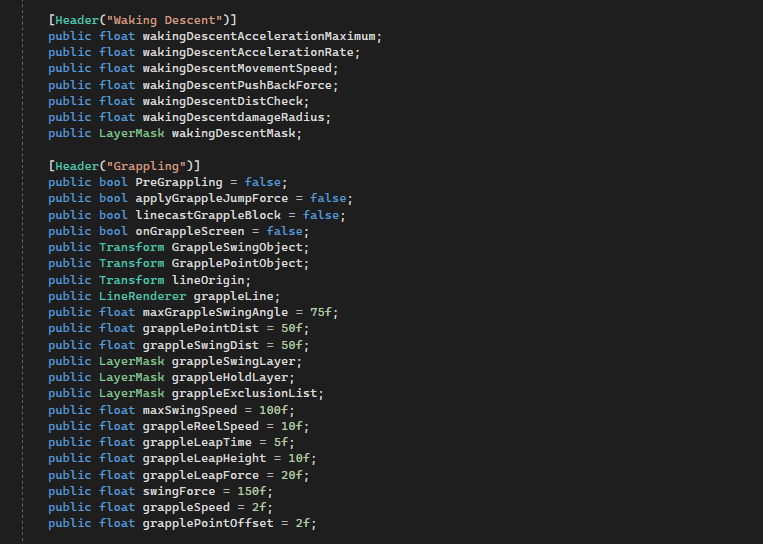
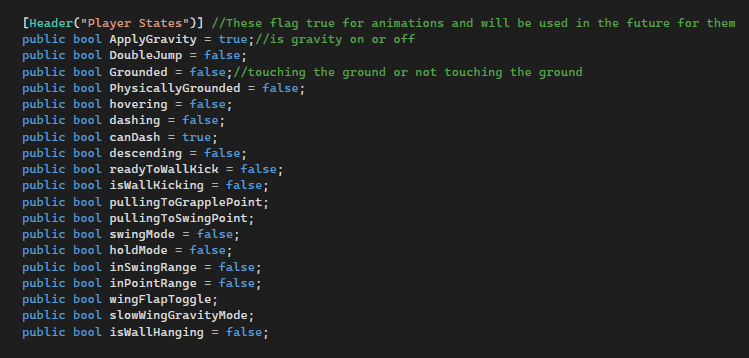
This is the most complex script of the entire project right now with about 2647 lines of code. There are other scripts at similar lines as well however, this script is the most complicated, because its more then making a good physics system. Its about achieving a good gameplay feel of how free the player can move around the environment. In phase 2, this movement will drive combat and in turn combat will drive further movement. Now first, lets start at the top and start with the “PlayerPhysics” class instance named “physicsProperties”. Each Unity header is what the group of properties control.
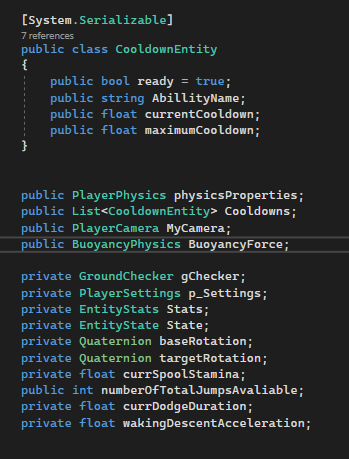
There is also another class called “CooldownEntity” which is added to a list named cooldowns that handle all our cooldowns for our dodges and any other cooldown required skills. The other public variables are instances utilized at runtime with the previously seen classes. Private variables store important dependencies required on the player object such as stats and the state of the player to be applied here.
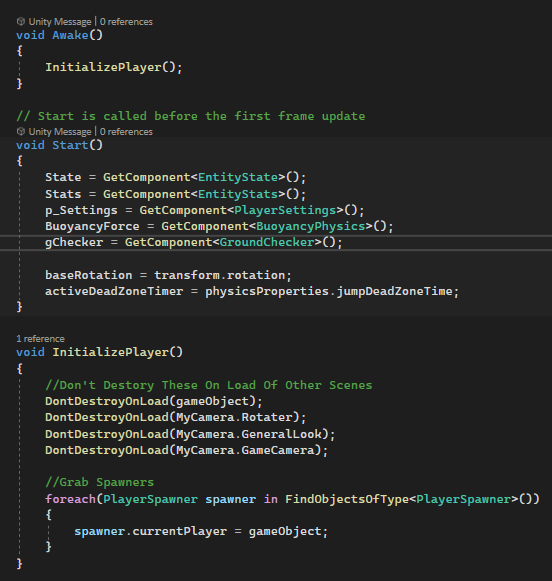
First, initialize the player in the Awake() function called “InitializePlayer()”then we get the components on the object in start to prevent null reference errors at runtime.
I grab the camera object and its associated objects including the player object and all of their children objects and set them to a DontDestroyOnLoad so that they move between different game. I also check if any objects that need to spawn the player on death or on starting up the game are set with the right object. The “FindObjectOfType<>” function checks the game globally to do this as a list. I loop through that list once on start up.
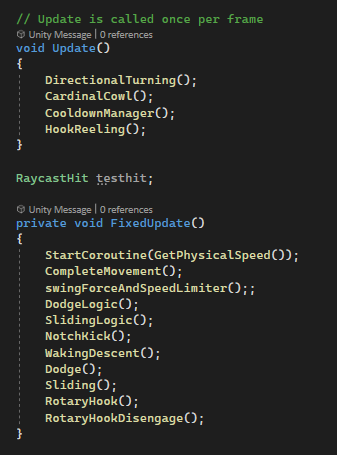
Now its time to break down the movement but before that lets take a look at the Update() and FixedUpdate() functions.
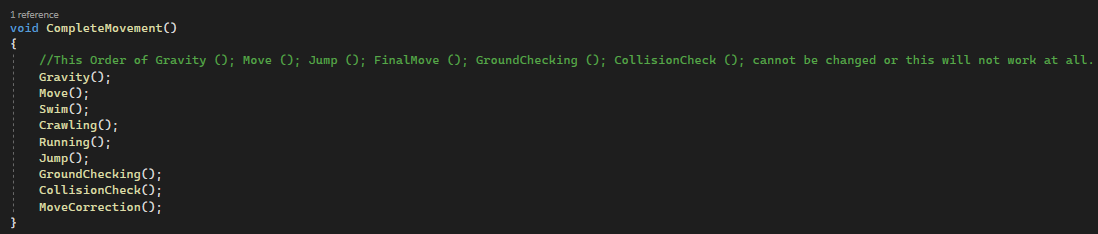
FixedUpdate() runs all of the physics because, all physics calculations should always be done in that specific update method which is run on a fixed time scale unlike update which runs on a per frame basis. Frames fluctuate and can cause unpredictable physics calculations and weird behavior. I created a coroutine to get an approximated speed of the object important for limiting swing speed for the grapple mechanics which will be detailed later. CompleteMovement() is all of the base physics running in a specific order as seen here.
This is the heart of which creates the framework for all the movement. Now let’s begin going into each function and how the data flows.
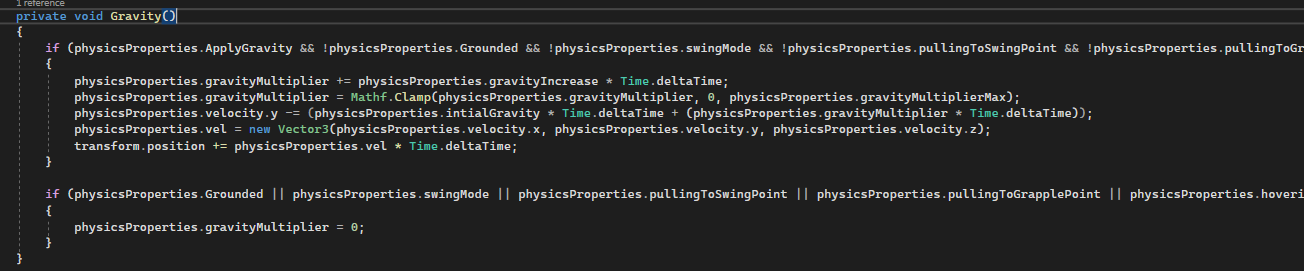
Gravity()
Gravity has some rules when it should and should not be applied. The if statement here allows gravity to persist if you are not grounded, the “ApplyGravity” Boolean is true and the other Booleans you see that correspond with specific other movement actions are not actively in use. Its important to suspend gravity during certain movement functions to override them in these scenarios with something else which happens to be the case when wall sliding or notch kicking (wall jumping). If the “if” statement can run then we add to the gravity multiplier and multiply it by Time.deltaTime which is a normalized time signature in the engine to keep the gravity force relative to the framerate as you will see in all the other additive cases throughout PlayerDriver.cs.
The gravity multiplier on the next line here is then clamped so it does not exceed the maximum or go below 0. Then we apply the gravity as subtractive value on the y axis to our velocity vector. Also, it is granted an initial gravity value so gravity is never calculated starting from 0 but from a higher number to have a more realistic feeling gravity. The next Vector3 “vel” is given a copy of velocity which will be better seen why later in the other functions. Lastly the Vector3 Vel is added to our own position and the world is updated by multiplying the vector with Time.deltaTime. This creates a natural feeling of gravity. Its also important to note a rigidbody is present and has its own natural gravity in conjunction with this from the engine on top of this. These 2 forces create an accelerative gravity. The final if statement is separated not by and operators, but instead or operators. If any of these are true gravity force accumulated must be set 0 and removed completely.
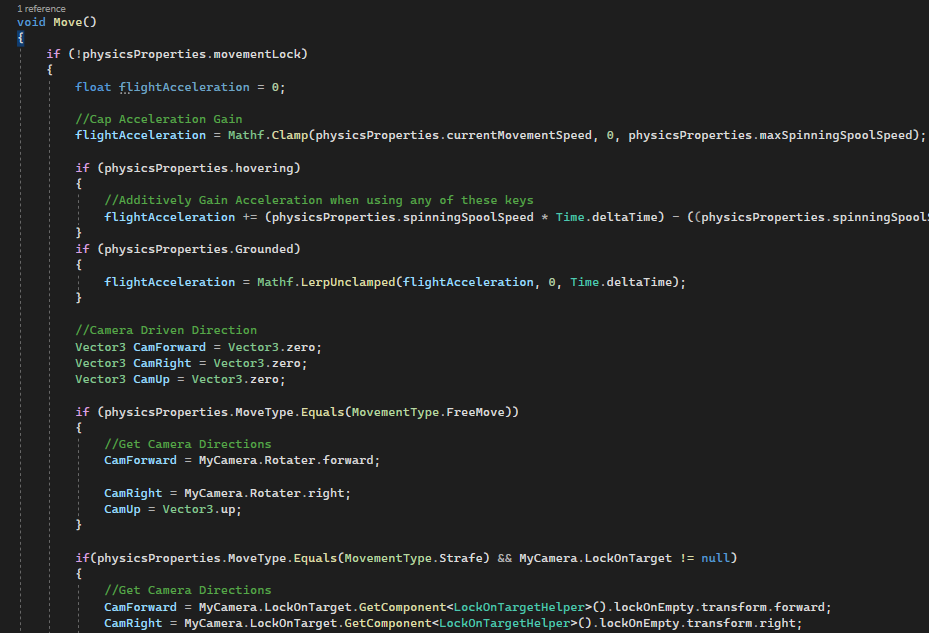
Move()
This is much longer than the previous function. This handles all player movement when inputting their keys to move in a direction. As you will see, the movement has different movement modes to interpret direction differently which is crucial for the movement to smoothly work with the camera, because the movement direction is camera driven.
First, all movement input cannot happen if the movement lock is true. This is important to prevent input during dialogue, cutscenes, etc. Then we have an acceleration value that is applied when in the air here when not grounded. This is applied only when hovering using the spinning spool technique that allows you to hover for a duration. If grounded then the flight acceleration is run through LerpUnclamped() overtime to 0 instead of instantly set to 0 to allow for deacceleration. Camera directions are given with the 3 next Vector3 properties named CamForward, CamRight and CamUp and are initialized with 0. Depending on the enum MovementType the camera driven direction algorithm will change. MovementType.FreeMove follows the direction the player looks and its’ relative directions. This is further applied to another script I will later explain called DirectionalTurning() which rotates the player to the desired direction. The mode “FreeMove” is used for general platforming and getting around the world. The MovementType.Strafe is very different. This mode is used for Z-Targeting exclusive for focused combat. You will be able to fight outside of the movement mode however, this is the best mode to fight enemies with melee weapons.

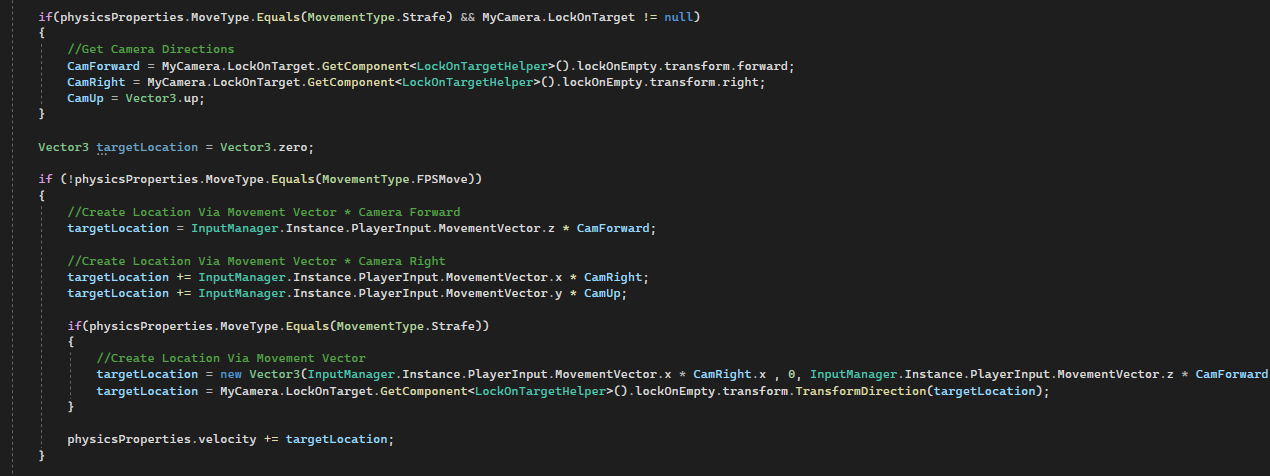
The cam directions are set differently. The look directions are now set to the directions of the nearby object we are locked on to. The camera script PlayerCamera.cs will detail how we get the right object and closest object to the player to be a target after pressing the lock on key. That will be explained in the cinematic camera system section.
Next, I create a new vector called targetLocation. The next if statement detects if the movement type is MovementType.FPSMove. If not then the logic below is applied. The targetlocation is gets W,A,S,D input vectors from the player via my custom InputManager.cs script that handles all Keybindings and controls. This will be detailed in the “Gameplay Options” section of this project. This allows us to move accordingly in the directions the player is facing like a fps shooter. This is the simplest movement and the easiest way to handle this. Fps camera switching and other camera modes will be detailed in the camera script section.
There is an override however, if the mode is strafe then we override that according to the locked-on object. After, taking the inputs of your x and y and z it is multiplied by the directional input. Directional input can only be between 1 and -1. 0 means there is not a key being pressed for the corresponding vector. So, multiplying the direction of the object’s vector with the input vector allows us to move left, right, up, and down according to each vector. For clarity, X is CamRight(A and D), Z is CamForward(W and S), Y is CamUp (spacebar and crouch) respectively. Now, we set the targetLocation Vector3 with all that information excluding the Y axis in this case and setting it to 0. Important step is to shift this virtual vector to match a physical object’s transform direction and setting it to the locked on object’s transform. Lastly, add the targetlocation position information to the velocity in the physicsProperties. However, there is more to explain beyond just getting directional information.
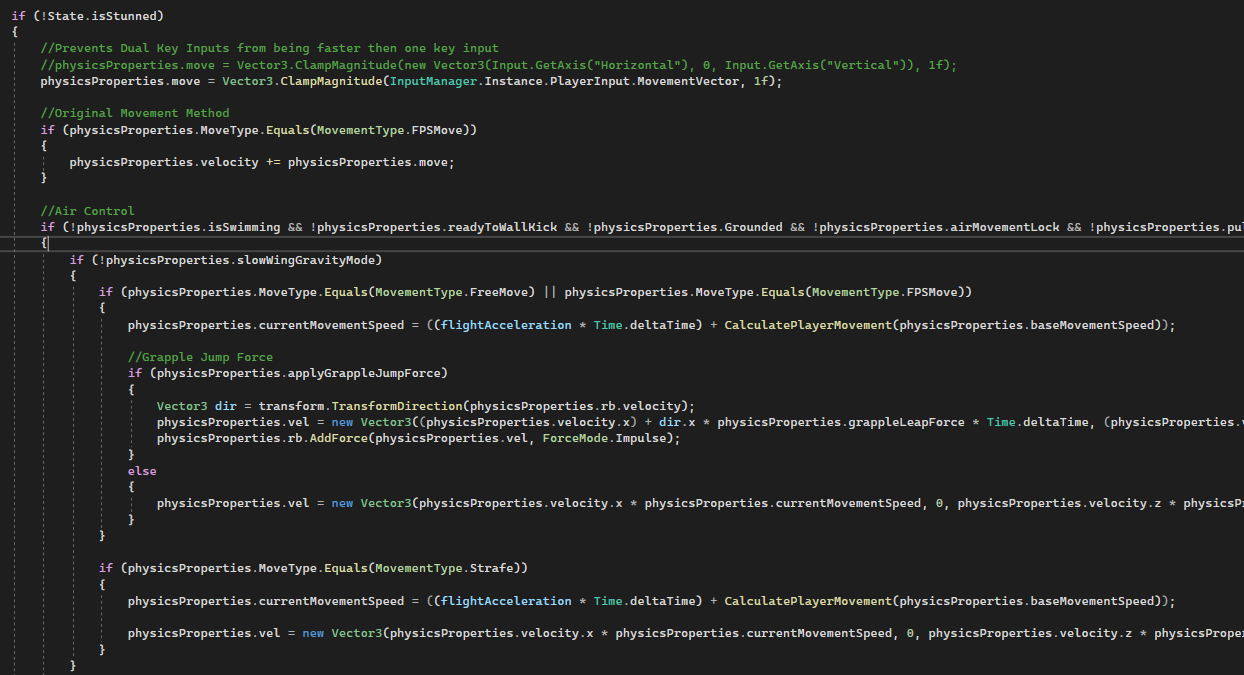
Now you finally see where player states and debuffs from the crowd control system come into play. The first if statement prevents all movement from this script if you are stunned. In the first statement we clamp the magnitude of the movement vector of our W, A, S, D that is derived from the singleton InputManager.cs. This prevents the player from moving faster when pressing 2 keys at once or inputting two different directions. The next line is inside of air control portion which handles airborne movement. If we are in a flying state of using the wings, we do not use traditional air control movement. If we are then we use the custom method of wings slowing your air speed. After, setting the current movement speed value which is run through a return float method called CalculatePlayerMovement() for movement speed that calculates move speed reductions and bonuses.

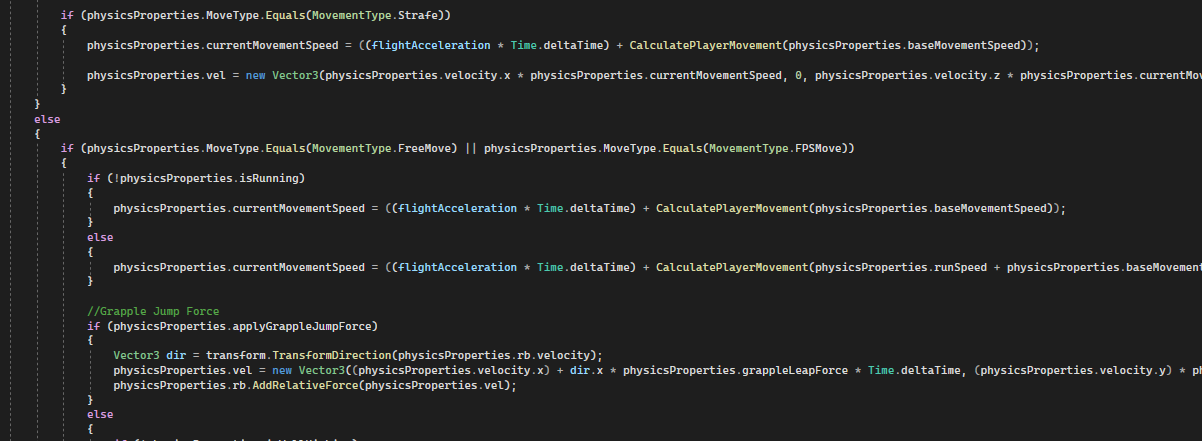
Moving back to the Move() function, grapple jump force is handled here with adding physics forces on release which is greatly increased in another script for the grapple hook itself that handles more finer details which will be cover later in this section. If the air control is not applying grapple forces, then it handles a default method of handling the Vector3 by setting it directly with speed. The next if statement handles strafe rules.
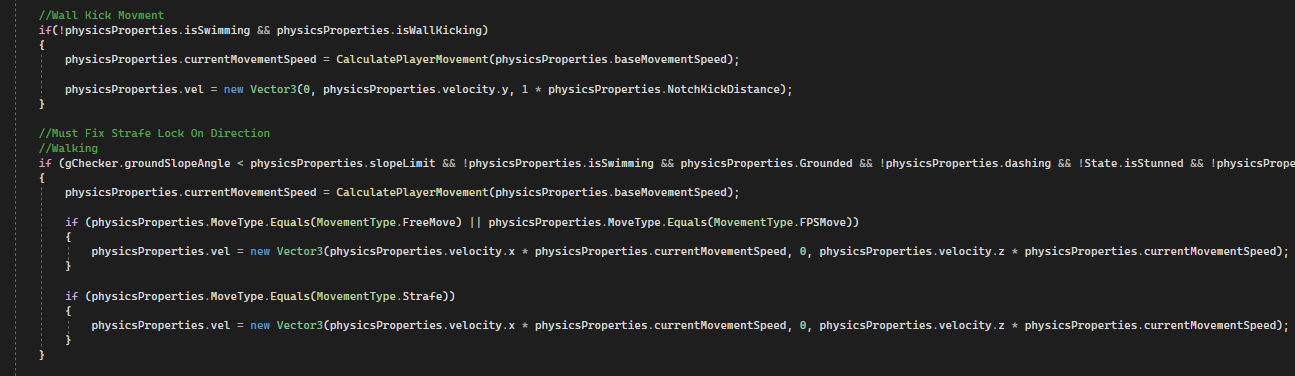
Strafe is handled the same way as the default except its given flight acceleration over time with in addition to the base movement speed. This is repeated for all the other actions. Lets move to the actual final movement of all these functions such as wall kicking, walking, swimming, crouching, etc. Here’s an example of what they all look like. You will see similarities.
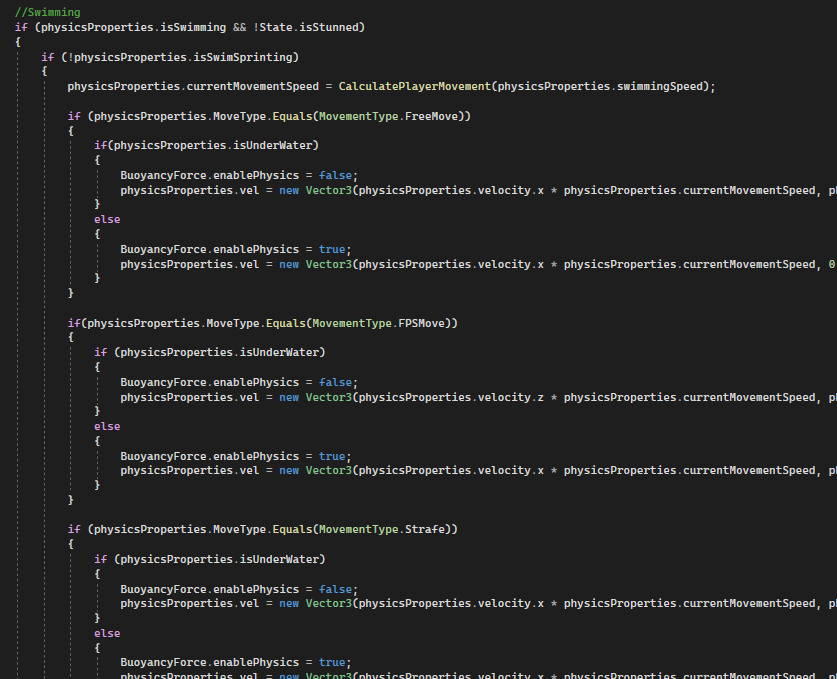
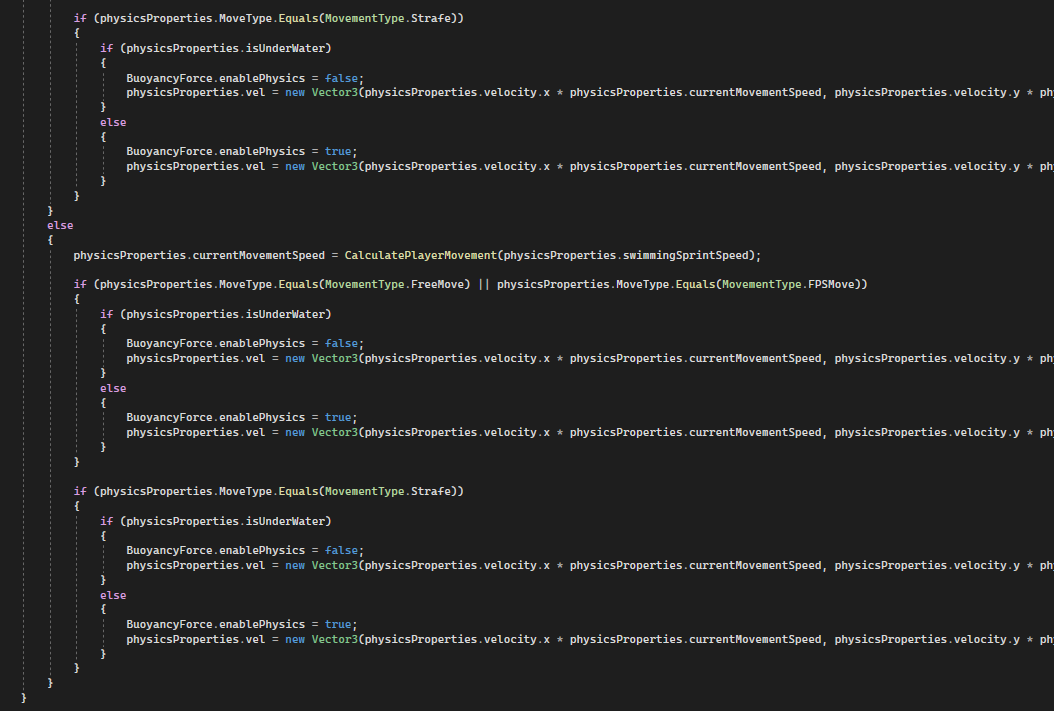
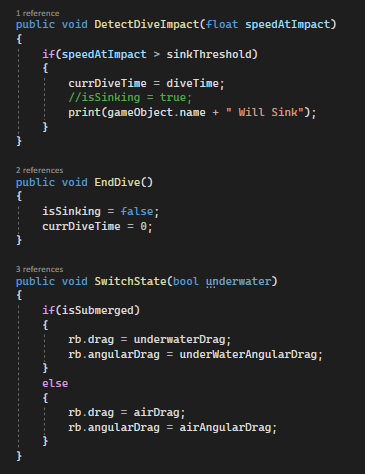
Swimming however, is more complex and has a buoyancy system that will greatly be explained later. Here is part of its logic here.
As you can see its handled differently, depending on the movement mode due to the camera mode much like all the other forms of movement that require these differentiations.
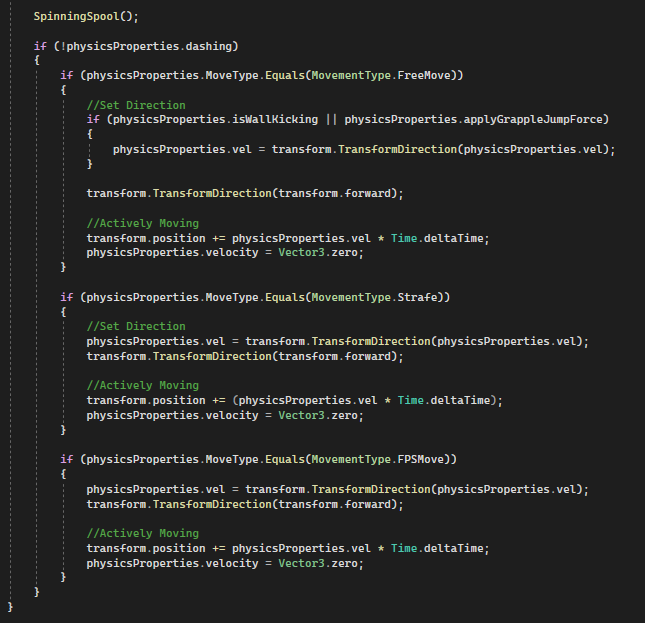
Now finally this is the part of the script causes the player to finally move.
The player transform’s position is finally updated with the appropriate position relative to your key inputs, the camera direction/enemy direction, the movement mode, and multiplied by Time.deltaTime to assure we are moving at a consistent framerate. Its’ a lot to explain, but this is how our position is updated.
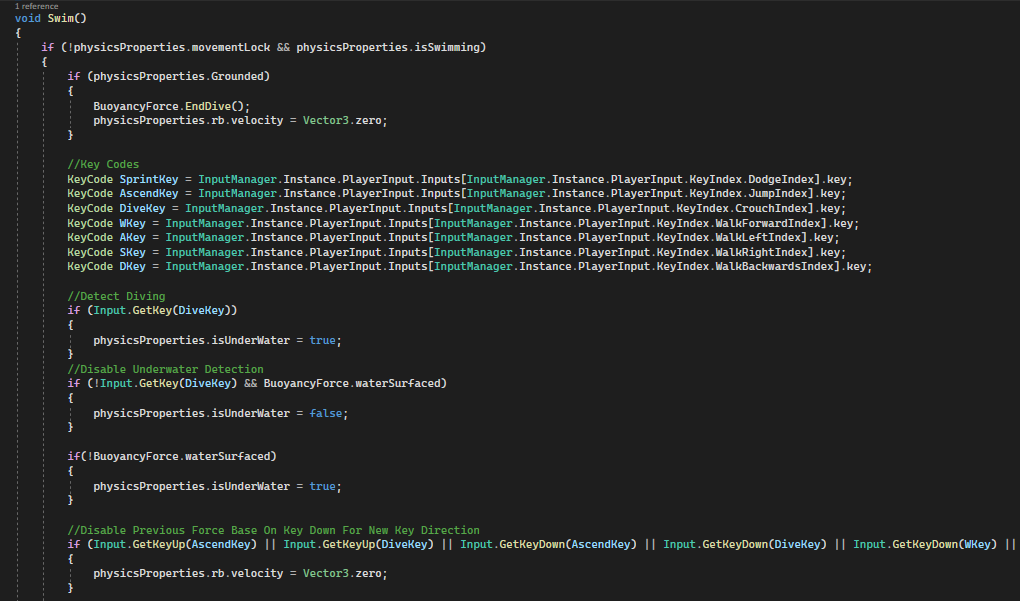
Swim()
will be a massive ocean within the game and so early development for swimming which needs to be improved in Phase 3 of development however, it is working decently well in this update.
First, I get keycodes from my InputManager system for each key including the spacebar for swimming up and the left ctrl key for diving. This void covers player inputs, but another script making this all possible and that is BuoyancyForces.cs. That script is the brains behind water physics behaviors on the player. I will get to explain that script after this function is completely explained. I set a swimming Boolean true or false based on input of the dive key and a special Boolean that helps determine more of this logic is the flag BuoyancyForce.waterSurfaced which detects true or false if you are below the water surface level. This will be more explained later in BuoyancyForces.cs. The series of or operators with keys prevent rigidbody forces from allowing you to coast upon releasing the key input.
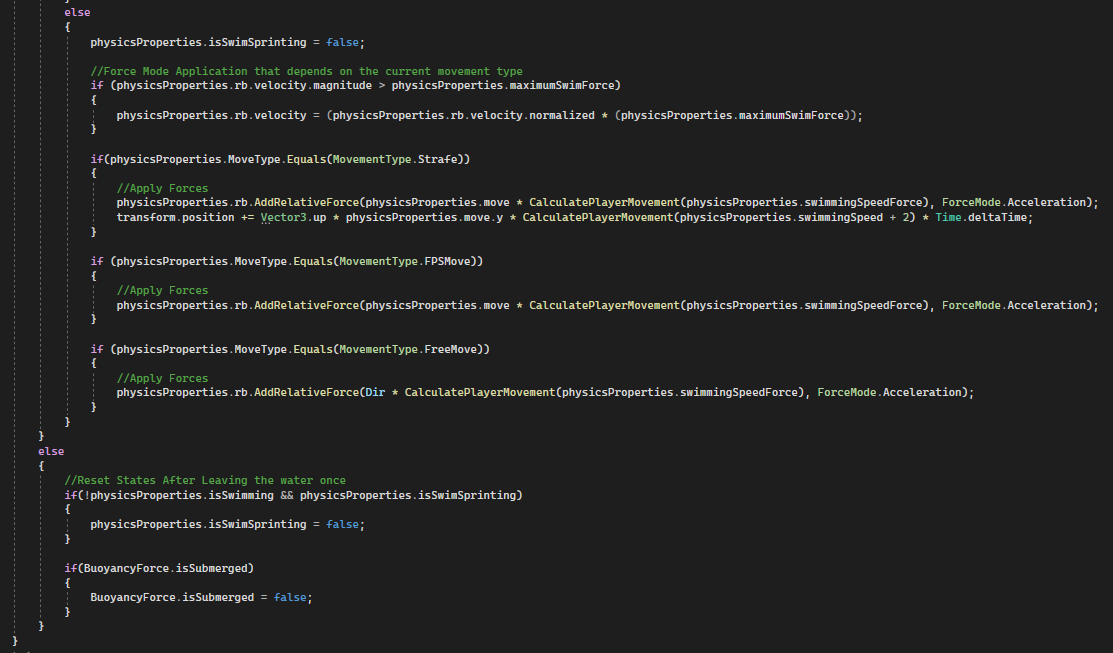
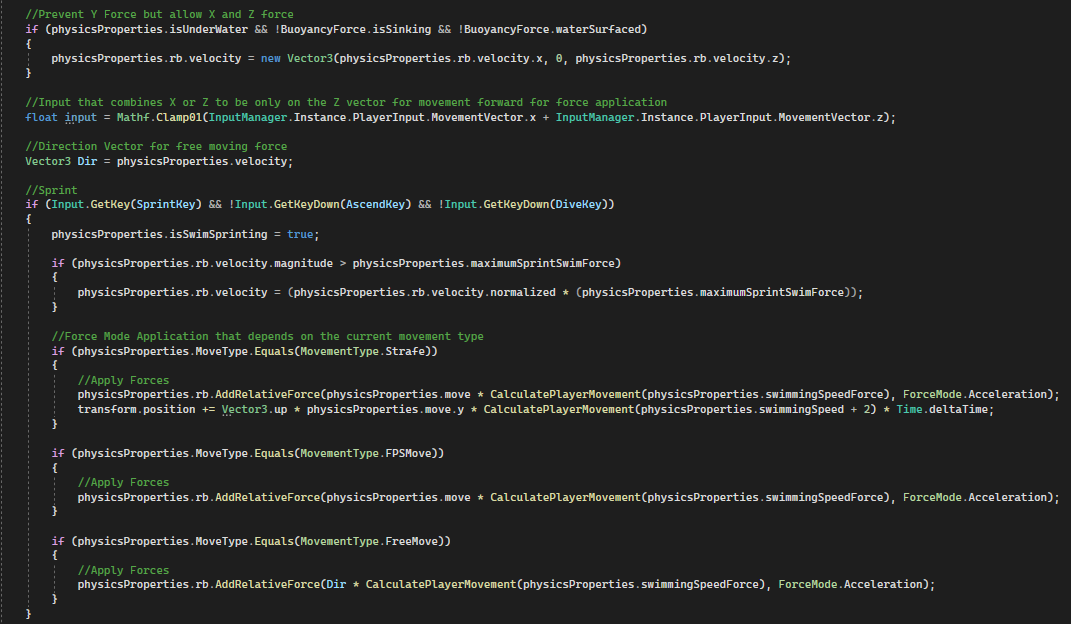
The above image handles sprint and non-sprint force-based movement through your rigid body. The input float combines two axes into one which is important so that a key and d key both drive forward or backwards movement. I set the isSwimSprinting true once you press sprint and no other action. This is not too important, but it will be once I create the player model and its animations in Phase 2. Therefore, it has no major purpose quite yet. I clamp the Rigidbody’s maximum force application by check its magnitude which combines the movement of all 3 axis and gets an accurate speed. If the speed exceeds the maximum swim speed force, it is clamped to be equal to the maximum force. It’s also important to note that ForceMode.Acceleration is used because, swim speed should be gradually faster not instant like ForceMode.Impulse would provide.Depending on the movement type, I handle how direction is calculated and then multiply it by the swim sprint force. This is near identical for the else statement as you can see below when you are not sprinting. However, it instead uses a different variable for speed called swim speed and sets the isSwimSprinting Boolean to false. Now, onto the brains of how water physics is being applied.
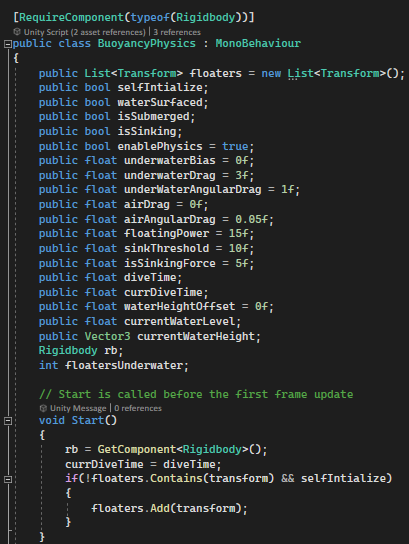
This is BuoyancyForces.cs. So, as you can see there are many booleans and physic settings. There’s a bit of defensive programming forcing an object that has this script to automatically create and require the component Rigidbody at the top in brackets with the keyword “RequireComponent”. This script cannot run without a Rigidbody and must have one. Additionally, the reason for creating the physics separately is because the player isn’t the only entity in the game that should be able to float on water. Also, in the case of complex objects it is important they are given the ability to have multiple floating points that work with each other. Such as creating a plank of wood that can float on either side and one of the sides that is submerged still has a side that wants to float above the surface regardless simulating a realistic floating effect. In the Start() function, I get the rigidbody dependency and set the object the script is attached to at least one floater being itself. Dive time is also set to a default maximum time which governs how long a object should receive bonus sinking force when falling from a high place into the water.
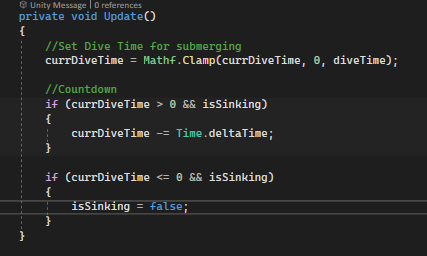
This is the dive timer which count down and once the timer is at or less then 0 it cancels the sinking effect.
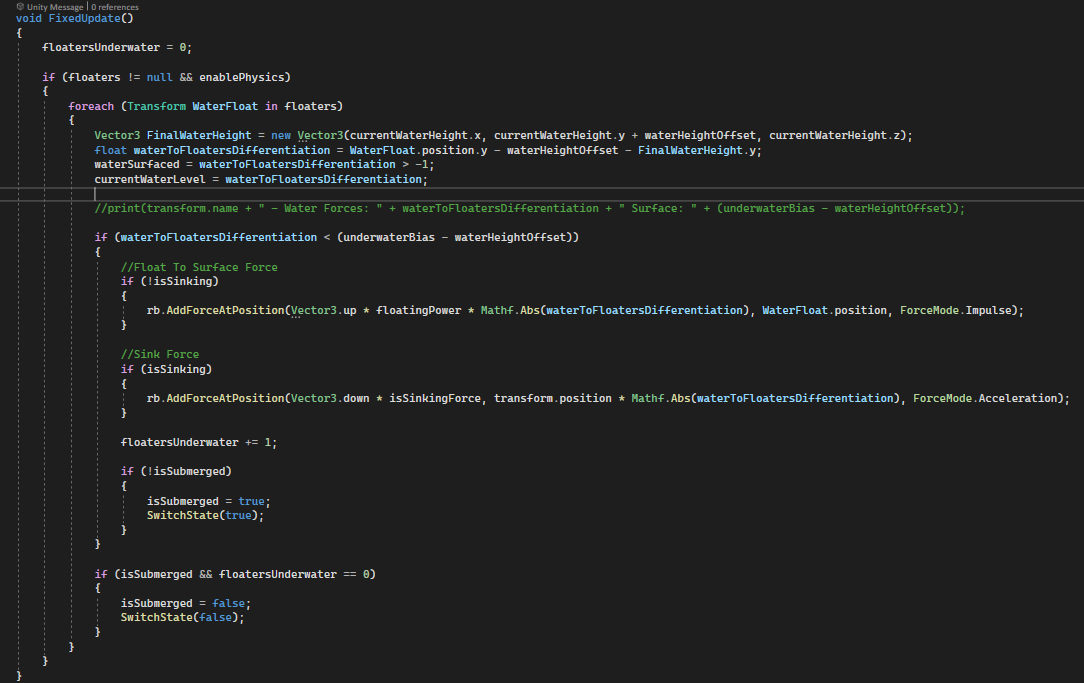
Now, its time for all of the FixedUpdate() physics calculations that are actually performing the effect to be explained. First, physics must be enabled and there must be at least one floater object for physics to be applied. Then I iterate on each floater transform object in the list of floaters. The Vector3 FinalWaterHeight is calculated by getting the current volume of water entered once submerged. The y axis is also given an offset to the player to look correctly positioned. This water height is obtained on collision in a different script on a different object connected to the player called WaterChecker.cs. This is put on a separate cube object with trigger enabled on a box collider. As you can see below.
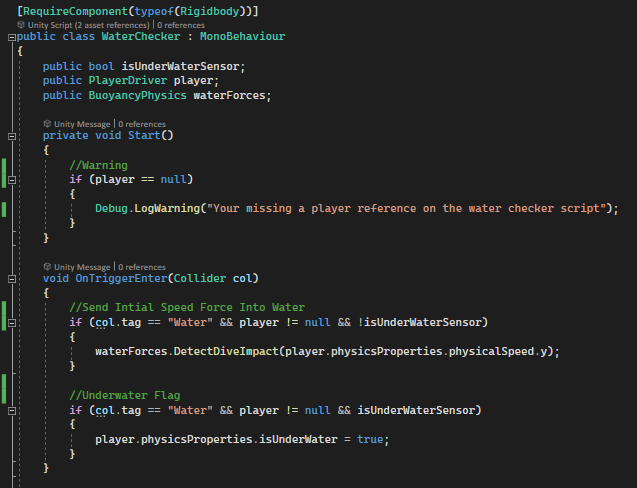
This calls from 3 built in Unity FixedUpdate() functions that require a rigidbody component and a receiving object that is also a trigger enabled collider that allows you to pass through the object. Once colliding with an object tagged with “water” will send a state switch call on the BuoyancyForces.cs script which in turn switches the physics setting on the player or floater.
This is on the Buoyancy.cs script and switches the drag settings depending on it being out of water or in water. Moving back to the previous script WaterChecker.cs.
OnTriggerEnter() triggers only once on entering a trigger collider. Once we enter water depending on the sensor type being underwater detector or a surface water detector it will detect if we are diving with enough force to send some additional speed force information to submerge us with additional force. Otherwise, if its an underwater sensor just changes the underwater flag true.
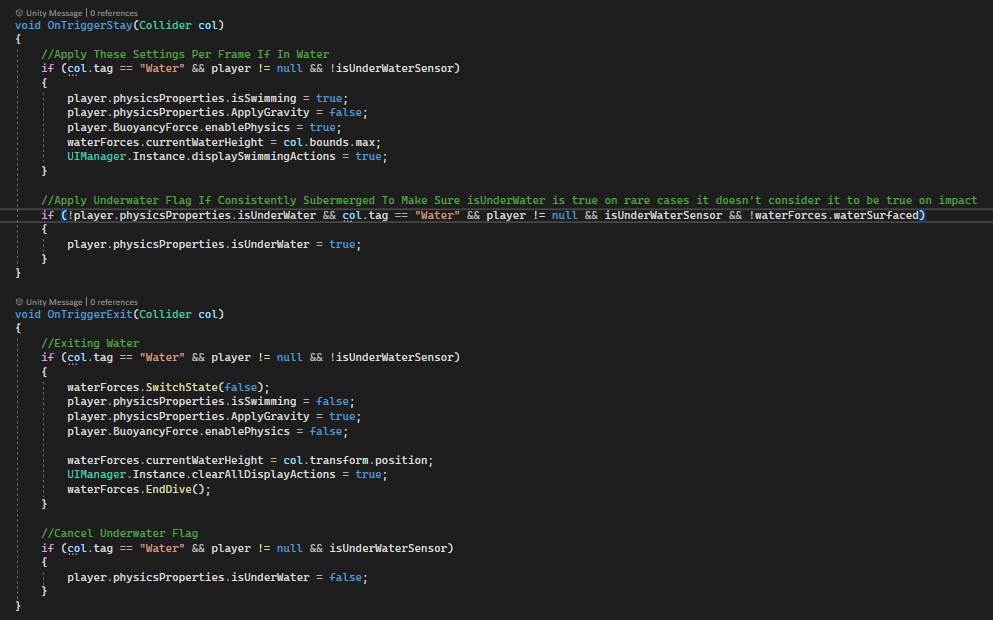
OnTriggerStay() is applied every time you are touching a collider but, its important to note that OnTriggerEnter() actions happen first and then stay action happen second in the engine. Depending on the sensor type, it will confirm that you are underwater or not. If it is not an underwater senor then it will call a switch state to make the character’s movement feel more sluggish by applying a new drag setting to it. Additionally, we shut off normal ground gravity, turn on swimming Boolean, enable physics, and set the current water height Vector3 to be the boundary of the collider which is also a Vector3 position.OnTriggerExit() causes you on leaving the water to cancel all water physics as you can see. If you were underwater and instead at the water’s surface then you will only set the underwater flag false. There are two of these scripts on two separate objects parented to the player. One is placed halfway down the player’s body and the other collider is over the head which detects that you are underwater if your head is underneath. The underwater one also has the Boolean isUnderwaterSensor Boolean checked true. Now back to the main script BuoyancyPhysics.cs.
Now, you see how I have achieved the water height Vector3. I then created a float to get the differentiation between the floater height, the offset applied and the water height which creates the value we need to reach to be considered surfaced. The “waterSurfaced” Boolean is true if we are above -1 which is important later down the script. The “currentWaterLevel” float is then set to this differentiation.Now that we know what the water level is, let’s compare it in the if statement. The “underwaterBias” float is set to a number that looks correct to the model and is subtracted from the offset we apply to character. If the character is under the underwater bias, then you are set to being considered submerged. If you are above this then you are at the water’s surface and instead given normal grounded drag settings seen here as shown earlier.

Forces are then applied with a rigidbody function called AddForceAtPosition() which does all of the force application. We multiply our global direction which is upwards with floating force number. Next, I get the absolute value of the “waterFloatDifferentiation“ float. I pass in the floater’s position from the foreach loop and apply impulse to force the player to surface quickly. The same math is applied to sinking forces however, the direction is downwards because this is for sinking and instead of impulse its set to the acceleration force mode. This allows the floater to slowly sink which is more realistic. This can be seen in more details in the corresponding scripts.
GroundChecking()
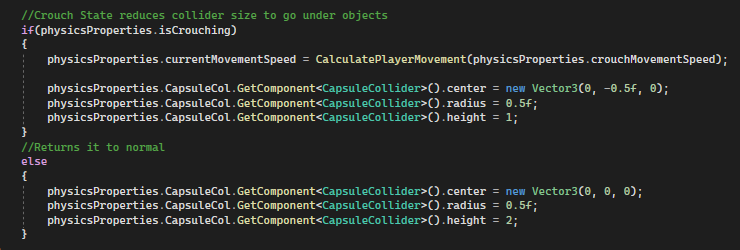
Before I get into how jumping works, its more important to state that Crawling() and Running() are not complex enough to go into any deep explanation. The only thing to note with Crawling() is that it shrinks the player’s collider to go under geometry as seen here.
This section is going to cover the next 2 functions. This includes: GroundChecking() and CollisionCheck() which are paramount for the player to detect the ground or not pass through walls.
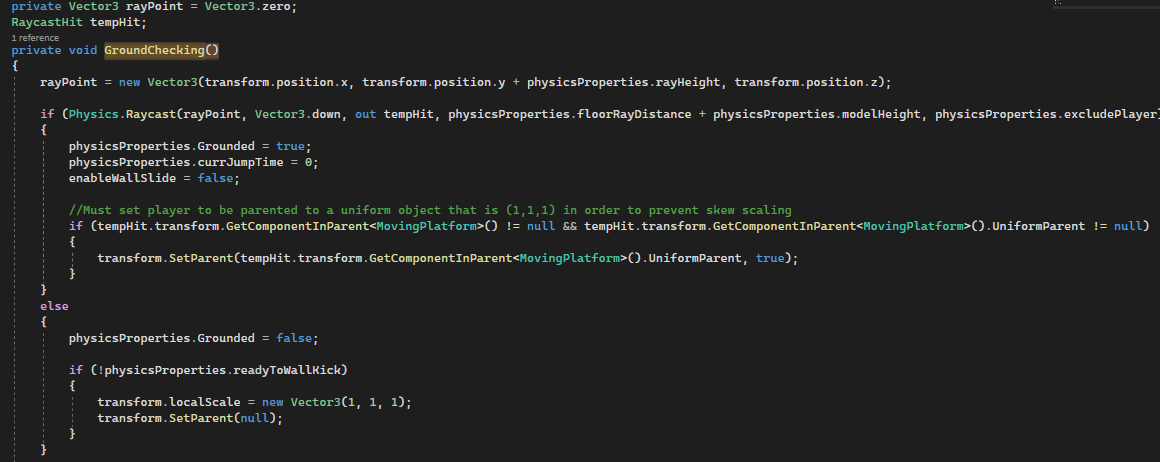
GroundChecking() as seen above sets a RaycastHit variable and stores a position for its origin point to cast from called rayPoint. This can be adjusted on the y axis to be higher or lower. The positions it inherits is from the player object so the ray can follow it. The next statement is an if statement that returns a Boolean called Physics.Raycast(). This fires the ray down globally from rayPoint and has an out function to get the point that is hit and store it. Rays can only return one single point of impact along the invisible line. Lastly, I set a ray distance and a layermask that can be considered the ground. If this returns true then we are touching the ground. If its false then we are in the air. Additionally, there is some logic to factor in standing on moving platforms to keep the player moving with the platform as well via parenting the object.
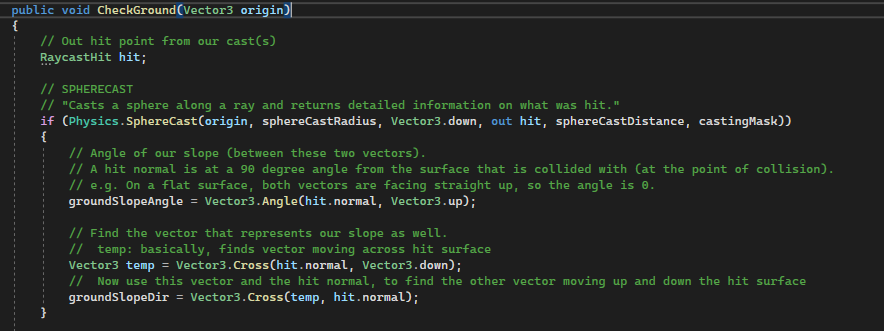
The above image shows the final part of this function. A vector3 named goal is created which makes the player set to an adjusted ground level. When grounded but not too far away from the ground the position of the player will be offset and snap back to the ground. The last nested if statement allows the player to slide off surfaces when the slope of the ground that is being stood upon is beyond a certain angle number. Before I get to CollisionCheck() for wall detection, I’m going to quickly detour to a script that helps determine angular floor slopes.GroundChecker.cs handles all of the logic for slope detection.
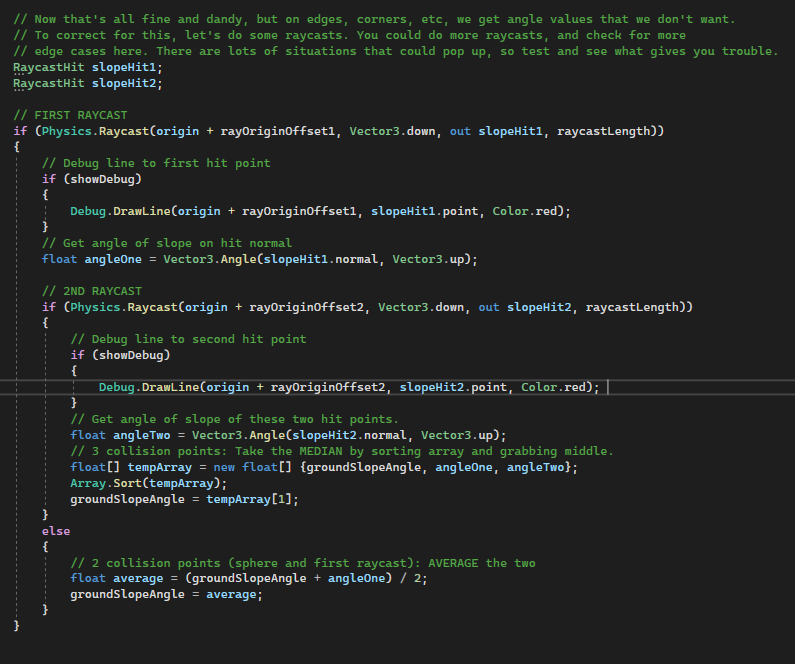
I perform a SphereCast() which projects a sphere instead of an invisible line. The out hit functions returns multiple points of impact. While it is casted, I call Vector3.Angle and pass in the hit direction and the global up vector Vector3.up. I set the float value to the current ground slope angle. I create a new Vector3 called temp and call a Cross product function between the hit point and the global down vector Vector3.down. I then get the direction by setting the ground slope direction to be equal of the cross product of the point hit within the sphere from temp and with the current hit point.
The above image contains the rest of the logic. I cast a ray down to the ground based on a directly set position from the public variables origin and its offset. If this is hitting the floor then I call a debug method which can draw the invisible lines and sphere casts to help fine tune the settings during runtime. Then I get angle one by calling an angle method similarly to how it was done with the sphere cast. This is repeated for a second raycast in order to obtain two separate angles and get the median between the two which is the slope. An array called tempArray[] is created that stores all 3 floats to find the slope. It is then sorted and the groundSlopeAngle is set to the tempArray to an index of 1. This becomes the final ground slope array if both raycasts are true. If none are true then an average is created in the else statement. It divides the first angle by two with the ground slope angle created by the SphereCast(). The ground slope angle is then set to the average of both angles instead.
CollisionCheck()
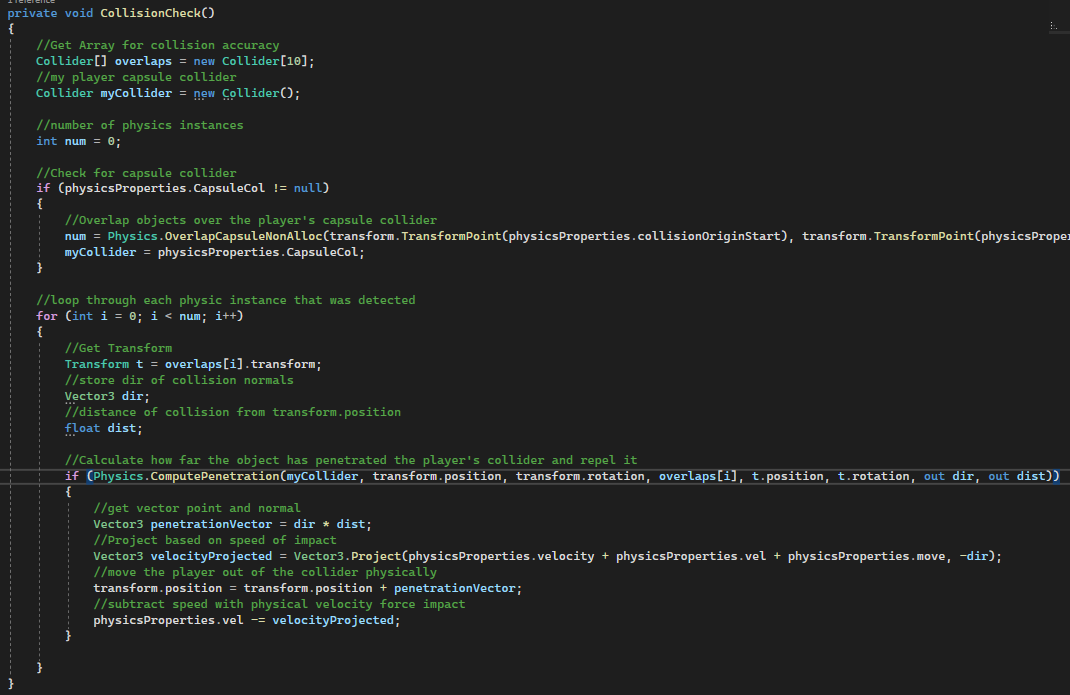
First, I create 3 local variables. Collider array called overlaps that stores how many objects we are touching at once which is set a maximum instance limit of 10. The higher the number the more accurate the physics. Another collider called myCollider which is our capsule collider that the player is using. The last one is an integer called num which carries the count of the number of collisions stored. Next, I perform an overlap function that does not allocate memory to save on performance. I pass in a virtual transform position for the sphere’s starting point and ending point. I pass in a radius, then the overlap collider array, the layermask that restricts what can be considered a wall in the game world and lastly set to query trigger interaction mode to use global. Global keeps the physics from being relative to the object which would cause strange behavior otherwise. This is done only when the player has a set capsule collider to prevent errors. We set myCollider to our capsule collider and move to the for iteration loop. The Loop begins by iterating on the list of overlaps we get by running the previous function Physics.OverlapCapsuleNonAlloc(). We create local variables that get cleared after each iteration called Transform t, Vector dir and float dist. This creates a way of grabbing all the information we need about each collision point. I use the function compute penetration by taking in the previous variables. It requires the collider that is being penetrated which is the capsule collider. Then it needs the position of the collider and so transform.position is passed second and transform.rotation is passed third. Next, overlaps[i] is passed with the iterative index the loop is currently on. Lastly, we pass the last few variables which is the iteration’s position and the rotation. Direction and the distance are sent with an out keyword to their corresponding variables. Now that everything is being compared through this method, now we can use it to push the player out of geometry like walls and any other object. I create Vector3 penetrationVector and Vector3 velocityProjected. Penetration vector stores the product of the direction and distance of the collision. Velocity projected calls a Vector3.Project method that adds in all 3 forms on movement I use to calculate player movement from Move(). I then pass in the negative of the direction of the collision. I invert it so that we move away from the collision and not towards it! Finally, we move the player based on this calculation by setting the position to be added towards the position of the penetration vector. Then I subtract the final input movement by the velocity projected. Now that both of these functions are completed with their explanations now lets explain how jumping works.
Jump()
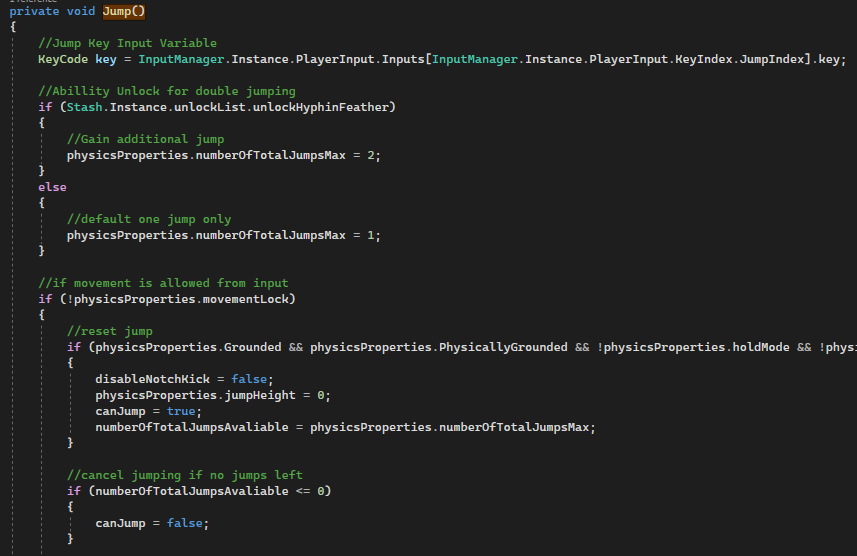
The jump function has both the simple jump function, the double jump function and parts of wall jumping as well. First, we get a keycode that determines our jump input. This borrows from my custom input management system which will be detailed later in the player input section.

First, depending on if you have the double jump unlocked or not you will gain 1 additional jump. If not then you only have one. If grounded reset everything to allow you to jump which includes dropping jump height to be 0, canJump set to true, disable notch kick to false and max out your available jumps to the jump maximum. Additionally, set can Jump in the next if statement to be false if you have no more jumps available.
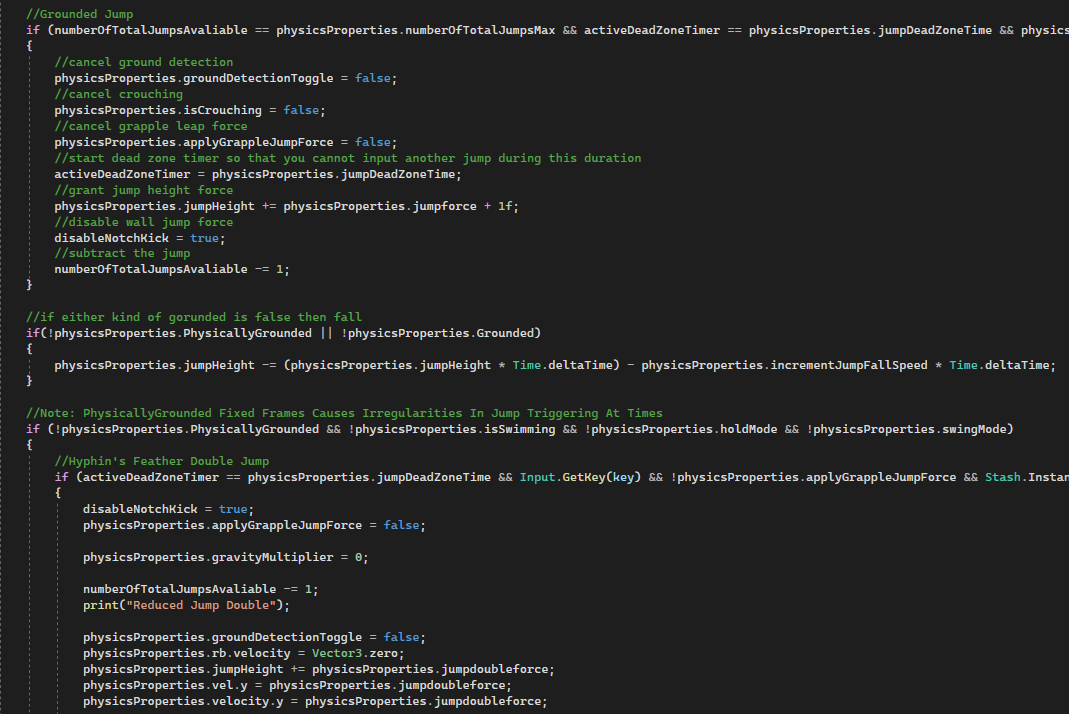
If you have jumps available and your grounded then we use the grounded jump. I set a few things to false such as canceling crouching so you can jump out of a crouch state. I also cancel grapple jump force, wall jump force and ground detection because during this action none of these things should be active. Lastly, I apply jump force + 1 and subtract the jump from available jumps. The next if has two ground detection flags. Physically grounded detects if your collider is touching the floor, the other more familiar grounded Boolean is detected if your ray shooting at the ground hit an object. Both working together has more accurate readings of being grounded. If you aren’t then you are going to hit the ground faster and jump height will be gradually reduced. The last jump function performs a double jump and does the same thing as the first jump except the force is applied in other Vector3’s that grant movement. This helps cancel out gravity. The Gravity multiplier is set to 0, rigid body speed is set to 0, vel and velocity along with jump height are all set to double jump force.
The nested if that is underneath “cancel wall kicking” is inside of the double jump function and causes the player to jump off of walls. Similar logic but some changes to correct wall jump movement. The last set of nested ifs handles the active dead zone timer. A dead zone is a period of time set that prevents any further inputs to prevent spamming of an action. This keeps jumping feeling reactive but not uncontrollable by the player. While the ground is not detected, a timer counts down and once it reaches 0 the ground toggle is considered true to detect the ground again by GroundChecking(). The last line of code allows the jump height to affect the player’s elevation and causes you to receive the force.
Sliding() SlidingLogic() Dodge() DodgeLogic()
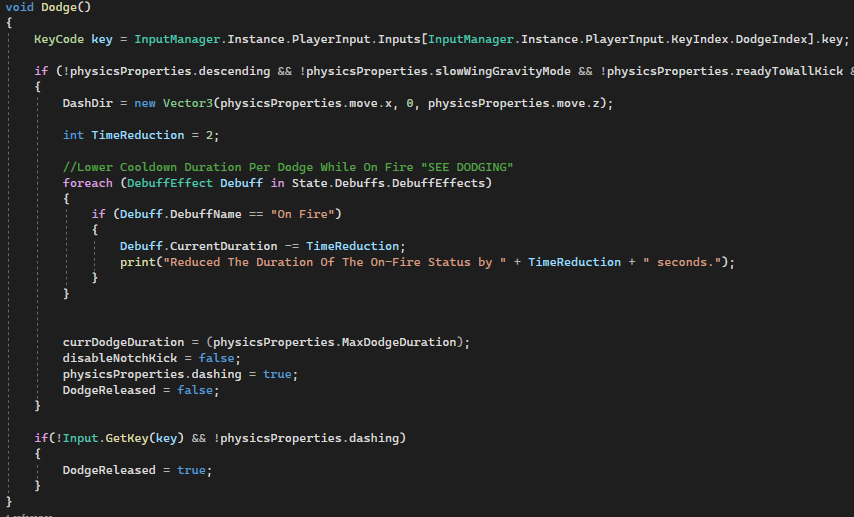
All 4 of these function virtually use the same methods with the only difference being that one of these allow you to move under geometry. Let’s take a look at Dodge() and DodgeLogic().
First, I get the dodge key and store it in a variable keycode called key. Then I get the direction my keys are being pressed in a vector called DashDir. The next variable is an int called time reduction and the following foreach loop uses it. Once you dodge, and if you are on fire then the current duration of the fire effect is reduced by the time reduction int. The dodge duration is set to the maximum duration in the following line after the loop and dashing state is set to true. Dodge release is a Boolean used to prevent odd behavior.
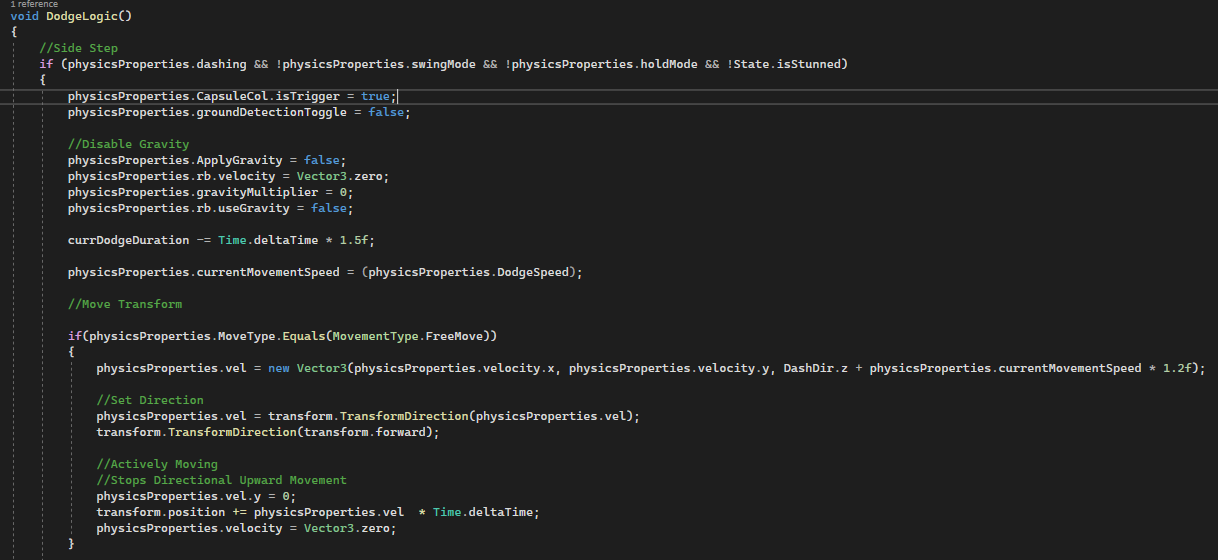
While in the dash state, the capsule col is set is trigger to move through enemies. Ground detection toggle is turned off, gravity is disabled, and the duration of the dodge is reduced overtime. The current movement speed is also set to the dodge speed. Depending on the movement type the dodge is handled differently. Each method gets the direction of your input sets the transform direction to be your velocity, sets the movement to follow the forward direction of the player, and then set the transform position to the new dash velocity direction.
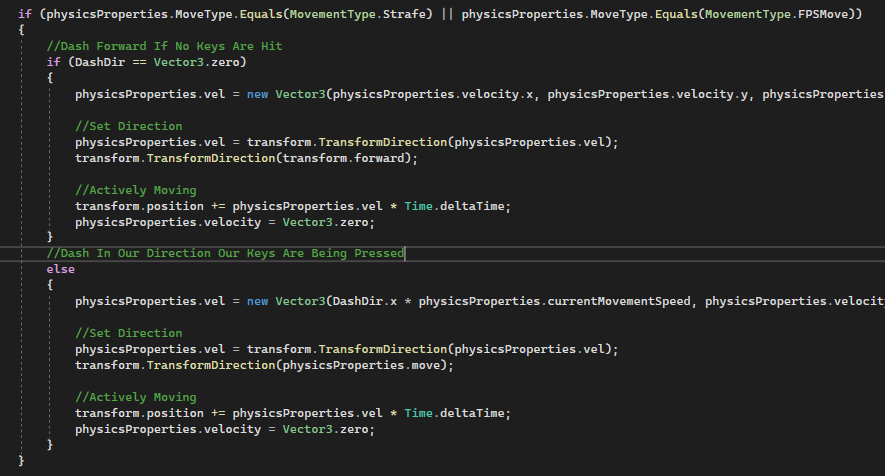
The following methods above behaves the same as the last, but the direction is handled differently if no directional keys are pressed. It defaults to dashing in front of you. Other wise the dash direction can be handled like a sidestep while locked on to a target like the Legend of Zelda.

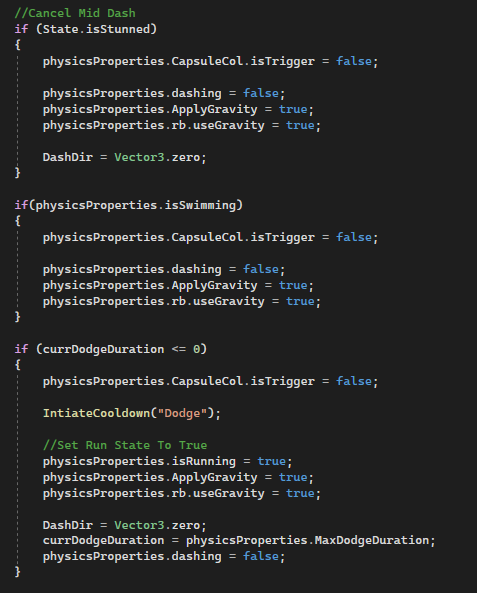
The following if statements handle cooldowns so that there is a period of time that must past between each dodge. Additionally, dash cancel conditions are here to end the dash early such as swimming. This also sets a run state when the duration ends and the state is reset.
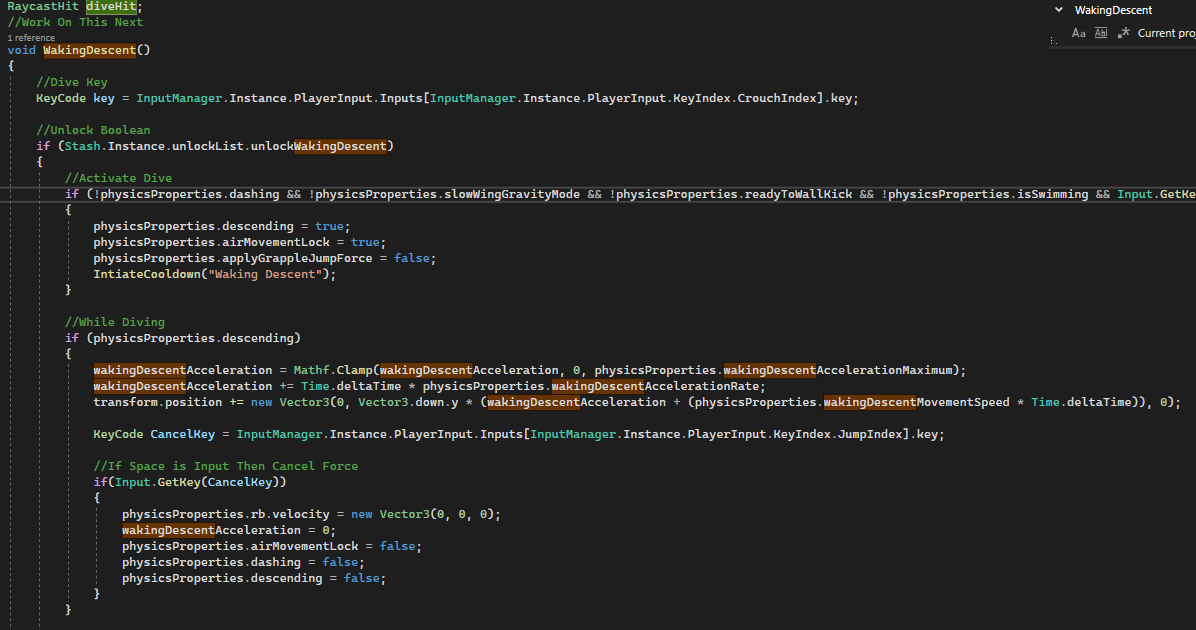
WakingDescent()
This is a simple ground pound ability to strike the ground and get out the air quickly. I create a keycode called key which is the input to dive bomb the ground. After pressing that key, while in the air you enter a descending state and start the cooldown for the ability. While descending, you gain an accelerate force that drags you to the ground faster the longer you fall. Your position is updated by adding the acceleration multiplied by -1. There is also a cancel method. While descending, you can press the jump button to cancel all of the force and exit the dive state.
The next half of this function is for the impact of the attack. When striking the ground you deal an aoe strike knocks enemies away and up from you while dealing damage. First, I get an array of hitColliders by calling an overlap sphere function when close enough to be considered grounded. Then I iterate in that list with a foreach loop. I create a damage source called WakingDescentDamage with its constructor. Then I call SendDamageEvent() to each entity caught in the blast. Then I get a bunch of random range variables that fling enemies into random directions with random forces each. I then create the random direction vector with Vector3 RandomDir and I apply the force to each entity multiplied by the random dir. The last few lines are for canceling all force to 0 on impact so that the player doesn’t move so fast to the point of slipping through the floor.
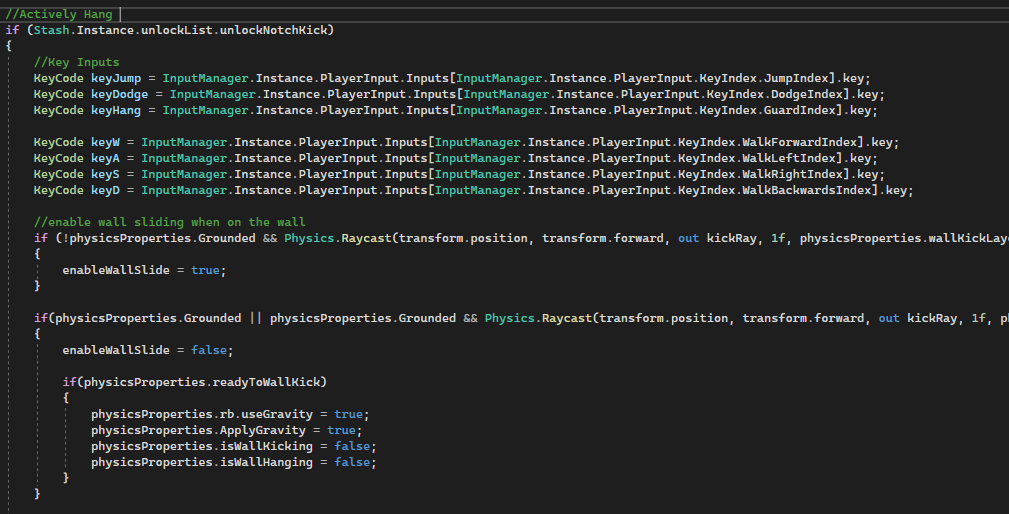
NotchKick()
Notch kicking is wall kicking and wall sliding mechanic. First, I get many different key inputs. I then make it so you are able to interact with a wall to slide. This can only happen when you approach a wall and face it while not grounded. The next if and nested if determine if you entered a wall jump input. If so, then gravity is enabled and other wall kick states are set false.
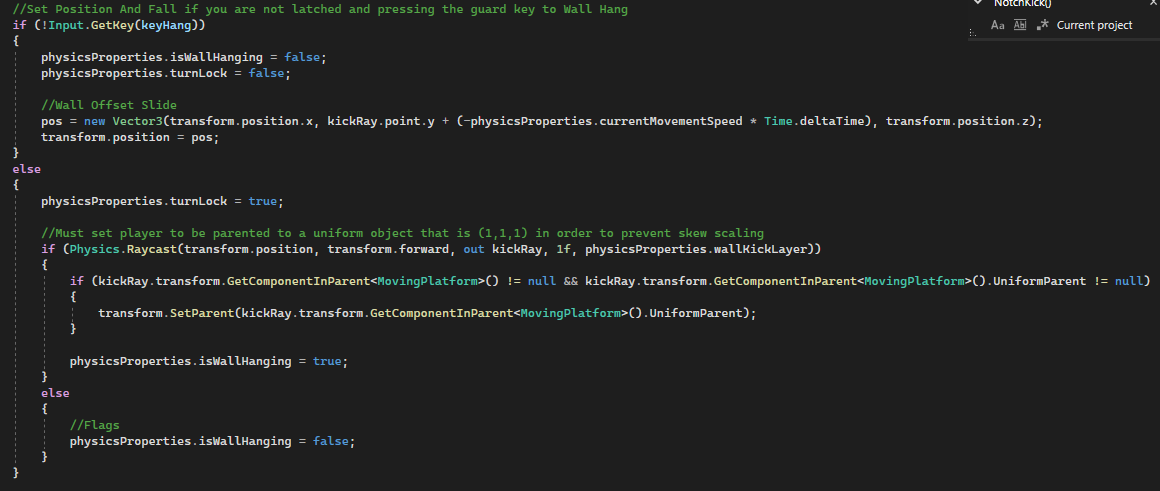
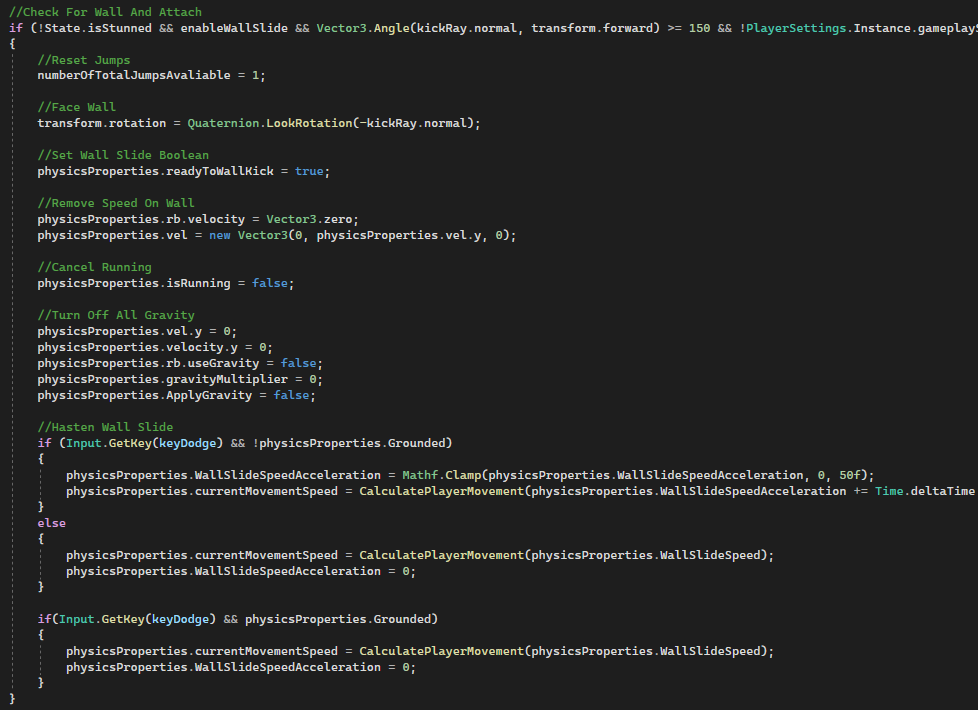
The above image is how the wall sliding works. Once attached to a wall, your jumps are adjusted and your character is snapped with the wall angle by setting the rotation to the lookrotation of the raycast.hit normal. The normal is the face of the object that the ray has struck and in our case we get the inverse of that to face the wall instead of face away from it. Then readyToWalkKick is set to true and gravity is adjusted to cause a sliding effect. The wall slide in the falling if is addressed with a gradual acceleration if the dodge key is held. If not, then no acceleration is applied and the slide is slow and constant. This is done by altering the current movement speed to be set to the wall slide speed.
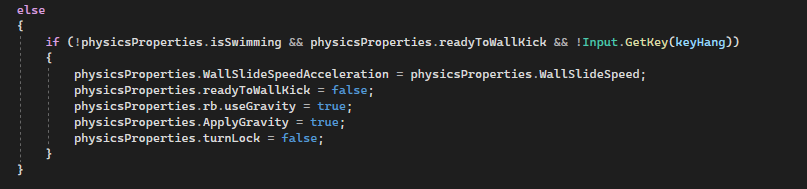
The else statement that follows the if handles resetting of these values under these conditions. This prevents player being locked into a permeant wall sliding state.
The above image allows for wall hanging. Wall hanging stops all wall sliding for you to hang indefinitely. It prevents you from turning your body while doing so. In the first if statement it checks if you are pressing the key or not and will keep the turn lock and the wall hang state false. It also will set your position to slide off the wall slowly. If you are pressing the button then all sliding is prevented, the turn lock is set to true and the wall hang state is set to true. There is a check to see if a wall is in front of you to hang onto in a raycast and has default false flag set if there is not a wall in front of you. The nested if checks if the wall is a moving platform and if so parents you to the wall to move with it.
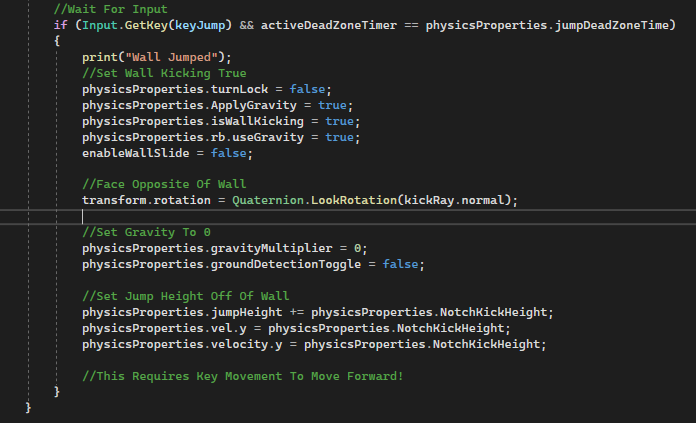
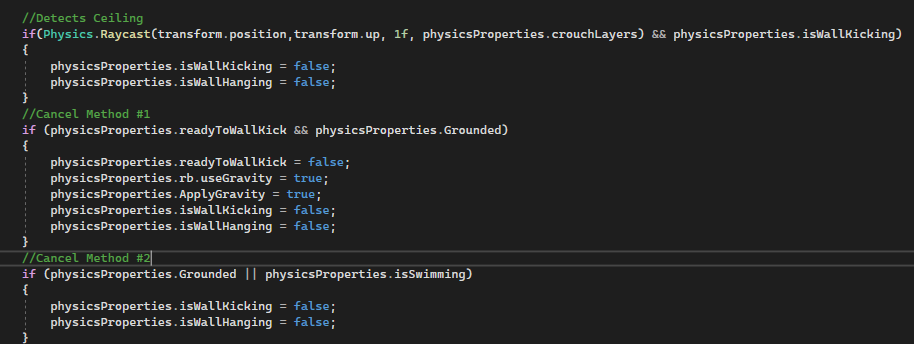
This is the wall jump action. After pressing the jump key while on the wall, all of your gravity is turned back to normal and the wall kick state is set to true. This being set to true moves the player vertically in the other Move() script. The other portion of this if handles the jump force. The image below are cancel methods to correct the states if they need to be exited out early or for other reasons.
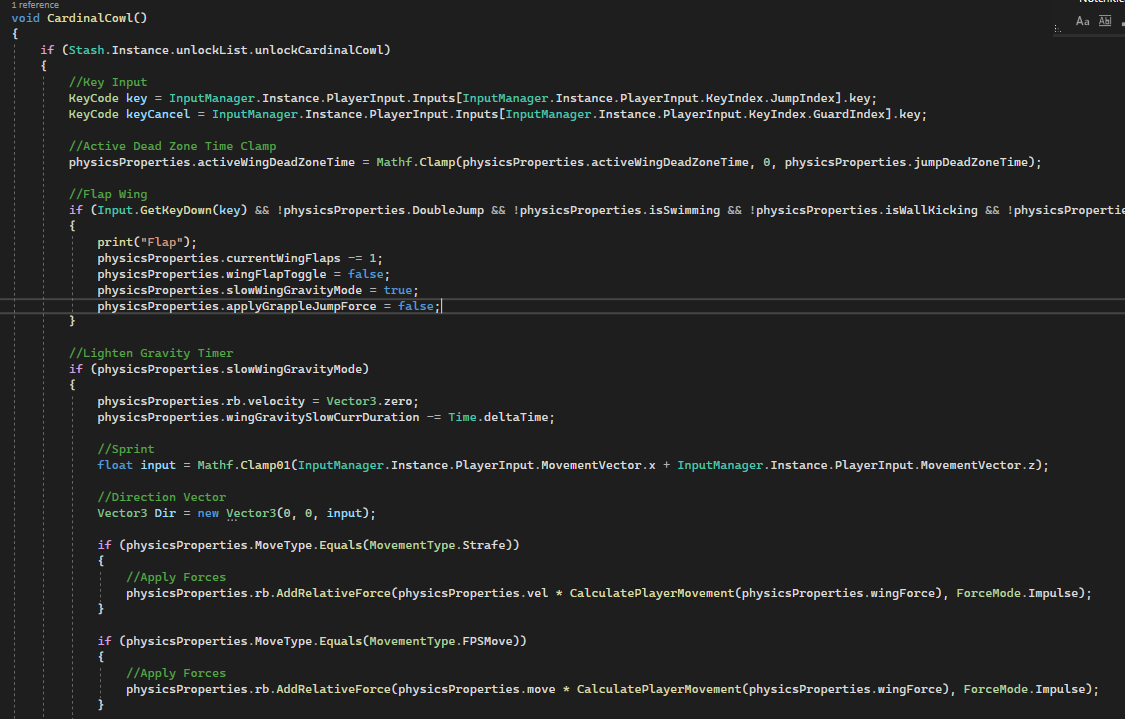
CardinalCowl()
This allows for wing flaps to get to higher areas.
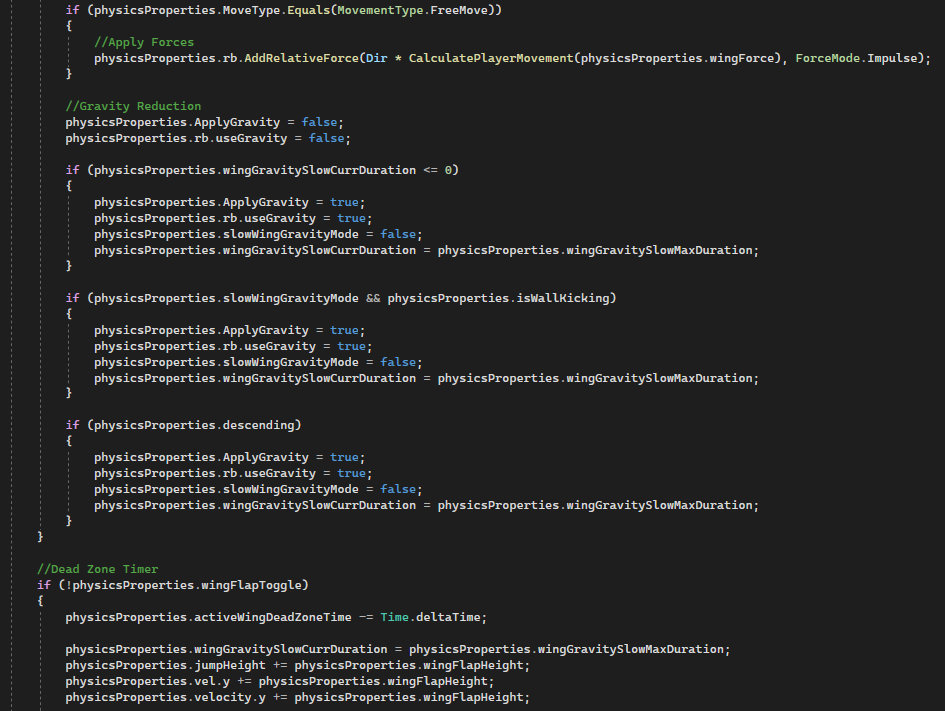
First, I get two key inputs. One is for the wing flap and the other is for canceling. I clamp the dead zone for between wing flaps between 0 and the maximum time. The first nested if handles the flap states being set to true by causing a slowed gravity mode to be enabled. The current wing flaps are also reduced by 1. As you can see this is handled similarly from the jump logic but with some special steps added in to make it feel like flight. The next if statement is for the flight window within each flap. The duration of the flight is reduced over time. Key input from x and y is combined into a float called input and clamped between 0 and 1. The input is then put into a Vector3 called Dir on the z axis. The following if statements applies force differently depending on the movement mode. Strafe mode multiplies wing force by the final movement vector “vel”. FPS mode multiplies wing force by the input movement vector “move” which stores your input direction. Lastly, the free move mode multiplies the Vector3 Dir with wing force. These different vectors alter how the player’s direction is handled based on the camera.

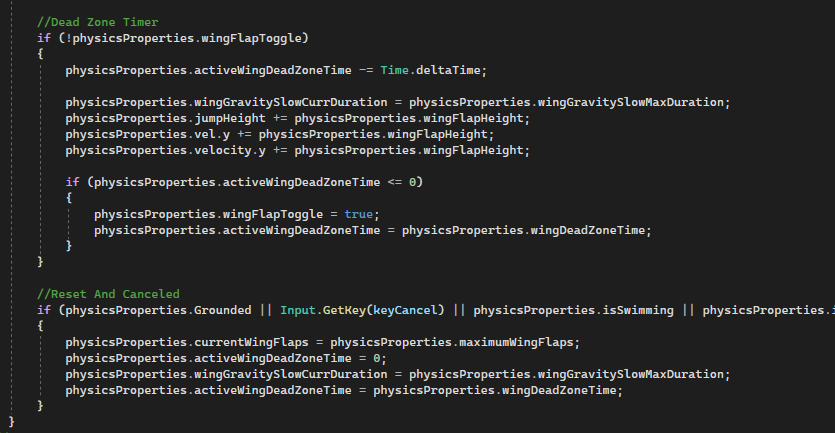
Gravity is reduced during the wing state. The following if statements return the wing state back to normal movement on different conditions. The second image details the dead zone timer which while counting down applies the flight overtime on the y axis. This is cancelled when the dead zone time reaches 0 to reset the timer and turn of the wing flight states. The final if statement separated by or operators cancel the force through different conditions.
RotaryHook() RotaryHookDisengage() GrappleLineRender() swingForceAndSpeedLimiter() HookReeling()
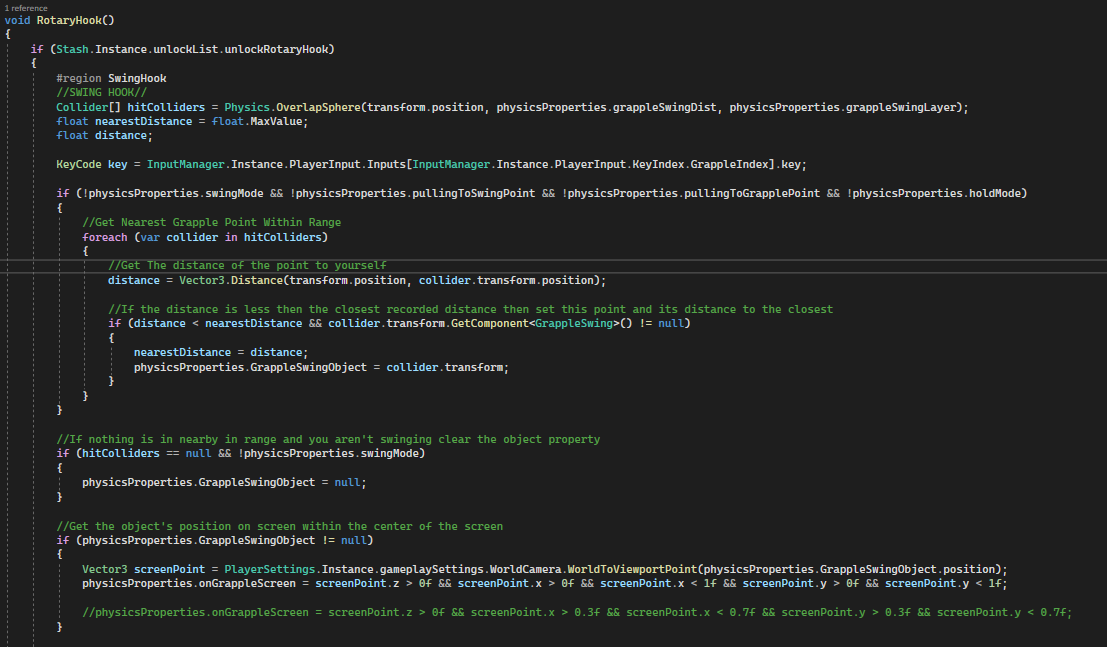
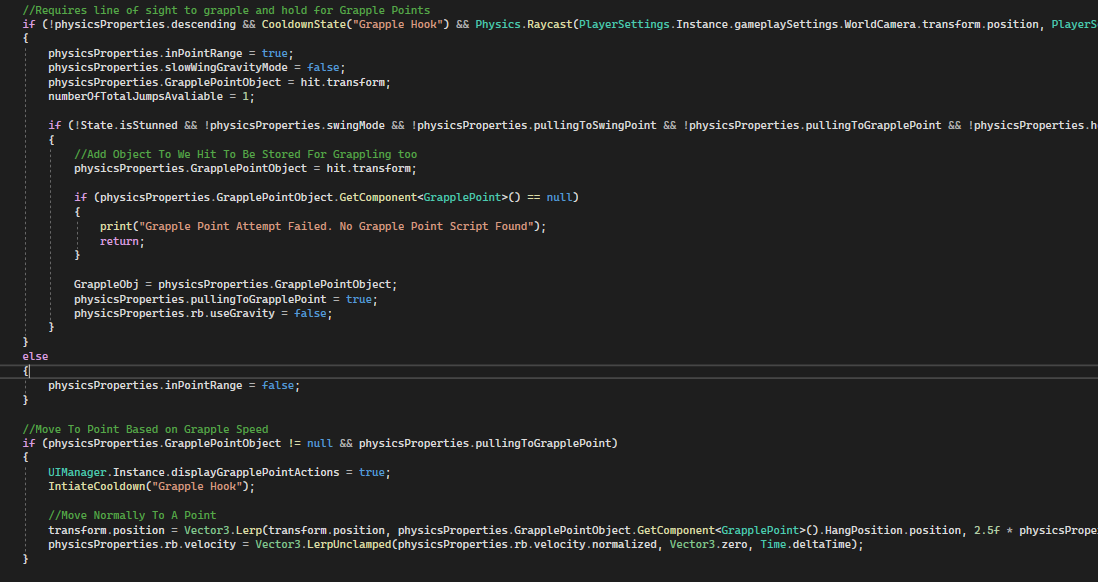
The final movement ability is the grapple hook and has many separate methods. I will not go into exhaustive explanation but, I will cover briefly how grapple swinging works. First, let’s begin with RotaryHook().
I create an overlap sphere and store its result in an array called “hitColliders” that stores all the objects that are around the player within a set range. Then I make one float named “nearestDistance” and another called “distance”. I loop using a foreach for the list for everything that is currently around the player and set distance to be calculated using our position and the position of the loop iteration object called “var collider.” Then I use an if statement to determine if the “nearestDistance” which is set to the largest possible float number by default is smaller then “distance”. If so then I set that new distance and game object to be stored to “nearestDistance” and “GrappleSwingObject”. After the loop is complete, then I determine if the grapple object is on the screen or not. This prevents it so you cannot grapple while not looking at the object. This is determined with Vector3 screenPoint and grabbing the camera’s viewport with a WorldToViewportPoint() function. Within that function, I pass in the grapple swing object. This is set to a Boolean in the next line called “onGrappleScreen”.
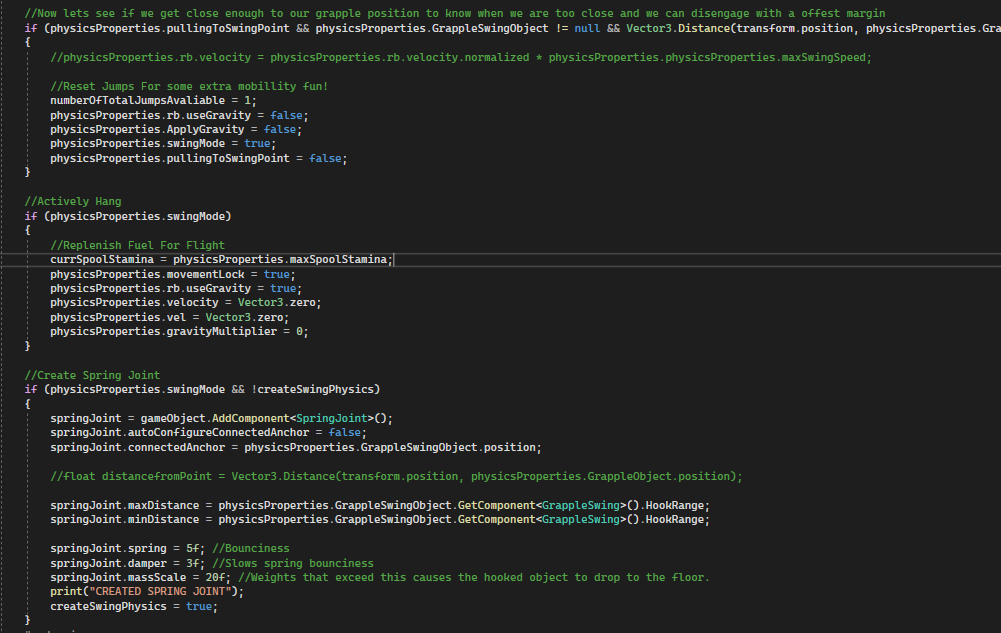
I then make an if statement that on key press it will cause you to be pulled to the grapple point and set the distance that must be reached in order to be in a swing state by calling AttachPlayer on the grapple swing object. The next if handles the pull action which properly sets your rotation to face the grapple swing object and I lerp the player position to the swing point.
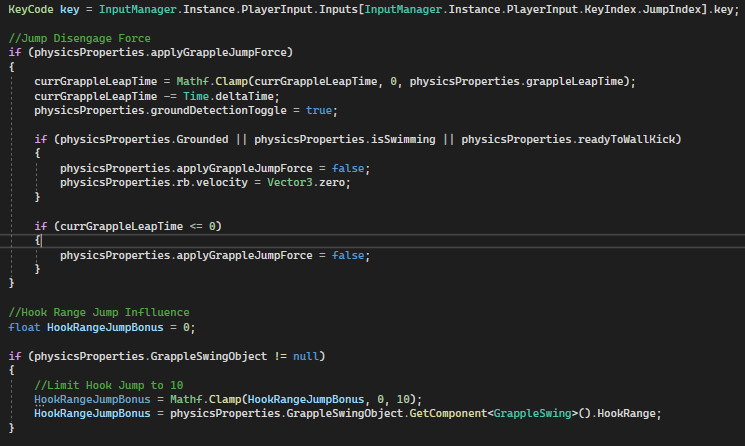
The next if performs a distance check while pulling. If you are within the hook range on the GrappleSwing.cs script that every grapple object must have you will no longer pull closer and will be moved to a swing state. During the swing state, the next if creates a swing joint which is built into Unity and is added to the player. Its origin point is set to the swing object and some physics with the spring joint component is set. RotaryDisengage() handles leaping off upon pressing space and applies some jump force to carry your momentum in the air.
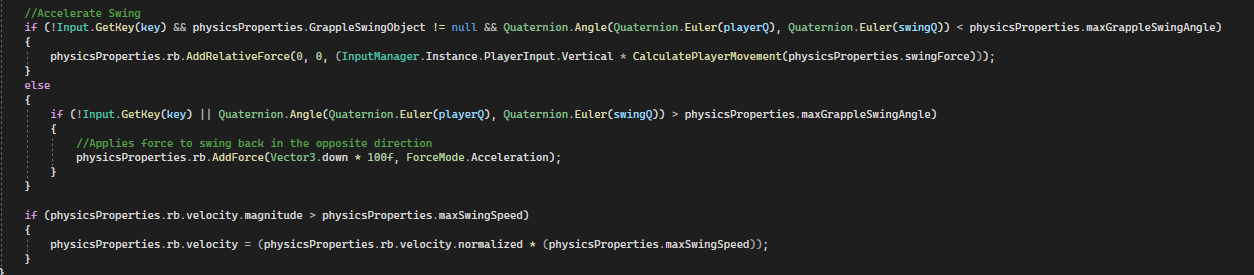

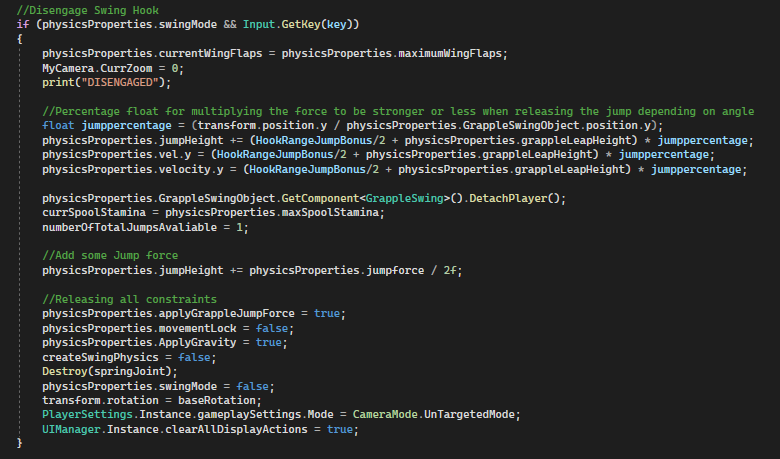
On the jump key press while swinging, I calculate the maximum speed along your current swing force in order to give a lot of height after disengaging. It destroys the spring joint after release and resets all of your grapple settings. Another, important mechanic is swinging while connect. Swinging is very simple. As you see below, I apply force and limit that maximum swing force by settings your rigidbody.velocity to be normalized and set to maximum speed force. I also have a few inputs set here to make the movement feel extra smooth. Its important to note that in order to jump properly off the hook you must create enough force and momentum to leap larger distances.

Another thing to note is that the angles between the player and the swing object is calculated with a maximum angle set. Once it is exceeded, the swing force is reversed downwards and causes a natural swing force motion like a pendulum. In the GrappleLineRenderer() function, I have a method that renders the line. Its very simple. I set the start point of the line to the player and the end point to the grapple point object.
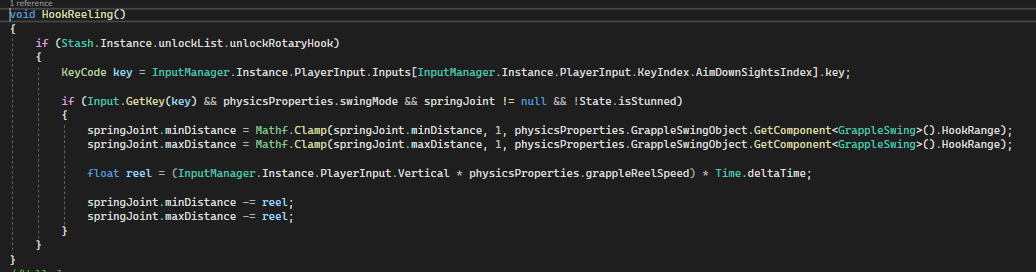
I call grappleLine.SetPosition() and set it accordingly. 0 is the origin point and 1 is the end point. Lastly you can reel up and down the hook with HookReeling(). Scrolling up or down on the mouse wheel increases or reduces your distance away from the point by shrinking the spring joint component’s distance.
The other hook type is a hook-shot within the RotaryHook() function.
The first if statement above casts a raycast and requires you to press the grapple key at an grapple point that has a GrapplePoint.cs script. You will then be in a pull state that moves you with a Vector3 Lerp function.
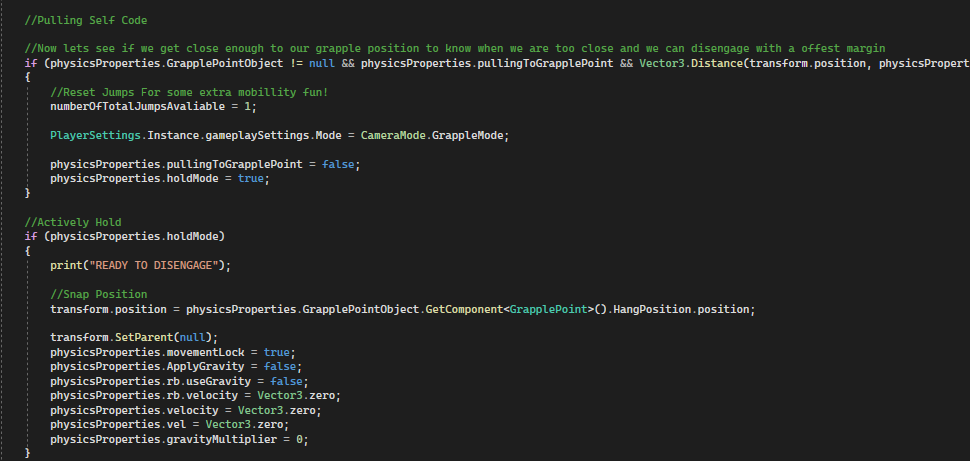
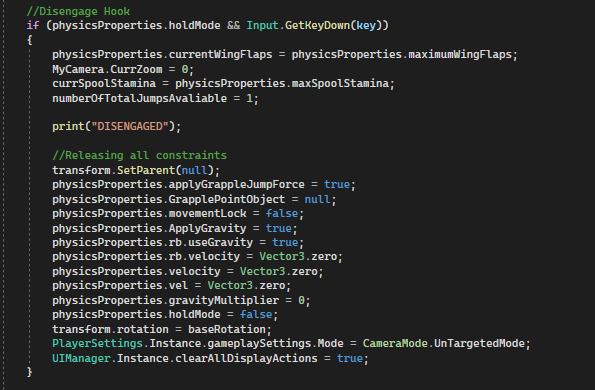
Once you are within a certain distance the pull function will cancel and you will enter a hold state. Once in a held state from the Boolean “holdMode” within the next if statement, I set the position to the position of the object in the GrapplePoint.cs Script. This script holds this transform as a reference and does nothing else. The final part of this hook shot function is the disengage. This also disengages by pressing the jump key as seen below.

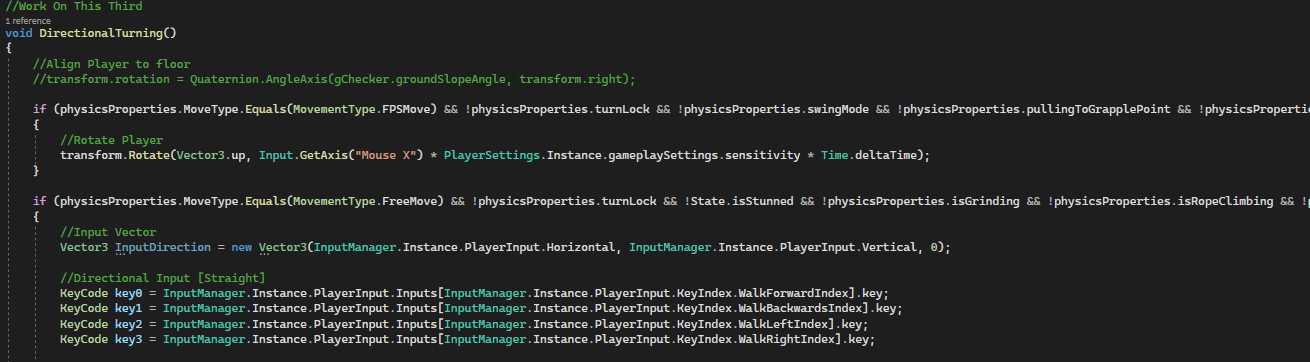
DirectionalTurning()
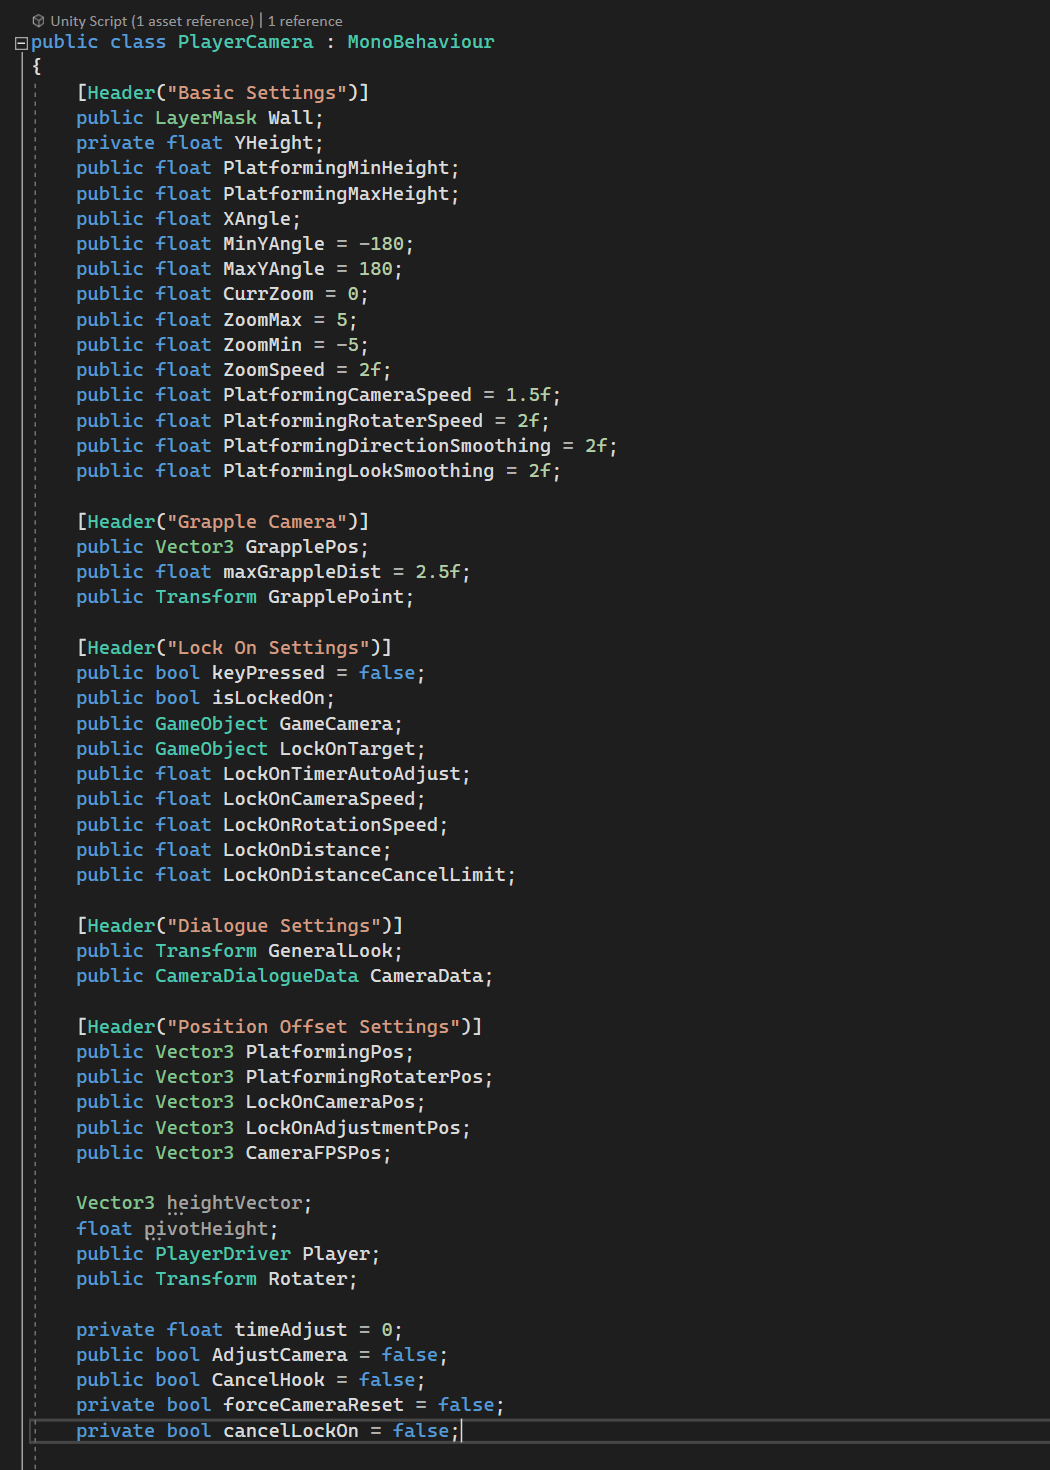
Its important to be able to rotate the player to navigate the world otherwise, this would be unusable in any 3D environment. The script has multiple cases to handle different ways of getting directional turning information depending on the circumstances and camera type.

The first if statement is the simplest rotation method. While you are in first person mode, the mouse x axis movement is multiplied by a float that is the rotation sensitivity and then multiplied by Time.deltaTime to keep the movement consistent over each frame. This is handled in a transform.Rotate in one line of code. Things get more complicated with free movement and the 3rd person camera. Firstly, I create Vector3 “InputDirection” variable that stores the x and y movement of W and S for Y axis and A and D for the X axis. This will be used to multiply the direction of our movements. Secondly, I establish all of the keys in my custom input management system and set them as a key code with a corresponding name for W,A,S,D.
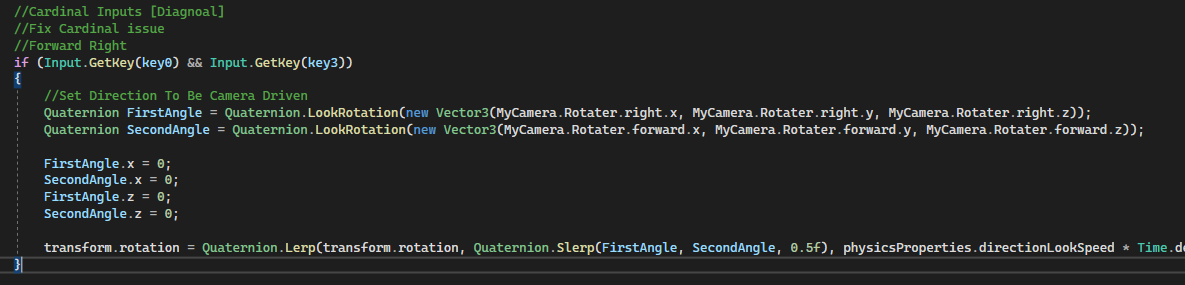
First, we must have a camera available. Its important to note that all the rotation is driven by the camera’s looking direction or the player’s looking direction along with the key input direction as well. If all 3 directions are known, then a direction can be handled and then rotated while key input is being pressed. The vectors above are for each direction that gets the camera’s direction. In the case of cardinal directions, 2 directions are taken and then halved to get the middle direction between both such as forward and right divided by 2 is equal to the diagonal forward right direction. This is applied to the appropriate corresponding vectors.
Depending on the key input direction, we rotate the player over time on a Quaternion.Lerp function with a predefined Vector3 angle from the previous image. The rotation type I handled here is when not swinging from a grapple hook. For example, the forward direction takes in the current rotation as its starting rotation and the uses the Quaternion.LookRotation() function which has the forward camera vector and rotates this speed by a float over Time.deltaTime. The vector lookrotforward y angle is set to 0 before we rotate because we do not want to rotate the player to look up to the sky or down at the ground with the camera. We want the camera to forward direction to only apply to the player. The same applies to Cardinal directions but with a twist.
For cardinal directions we check for two inputs. In this example above, it is for the forward right cardinal angle. The rotation is created by combining two angles and lerping them using a slerp as a rotation over time. The first angle is the right angle and the second angle the forward angle. Its important to note that the rotator object is an empty object that serves as the orbit point of the camera and is not the camera itself. After, creating the vector rotations the x and z axis for both are set to 0 to prevent rotating in either of those directions. Lastly, it is lerped like before but instead the second rotation parameter is a slerp function. A slerp function gets an interpolation between two angles. In our case, we want the mid- point of them and so I pass in 0.5 inside the slerp function which is the diagonal direction. I lastly pass in the lerp of the direction speed multiplied by Time.deltaTime to keep the rotation speed consistent.
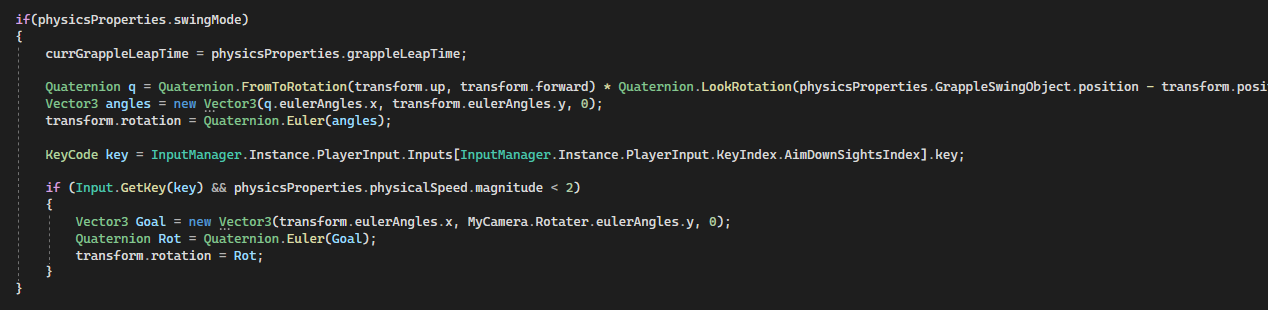
The quaternion “q” is establishing our rotation. This handles the direction your character will face when swinging on your grapple hook. First, the grapple time is reset and then we start to establish our angles. This helps rotate the player’s head to point towards the grapple point and then face the forward of the camera. This is multiplied as a look direction from two FromToRotation(). The first one is our local rotation up and forward passed in. The second one is the midpoint between the swing point and the player. Subtracting two positions gets the direction to face the objects in 3D space and I pass in the transform up. I then create a vector3 and use the angles of q and of the player and leave the z axis as 0. I then set the player rotation to this and do not lerp at all. The last part is simple. I set the rotator object which determines our angle that the camera is facing and change the angles of the player to match the rotators forward direction when swinging. Lastly, I set the rotation “Rot” to the player transform after converting it from a vector 3 to a quaternion.
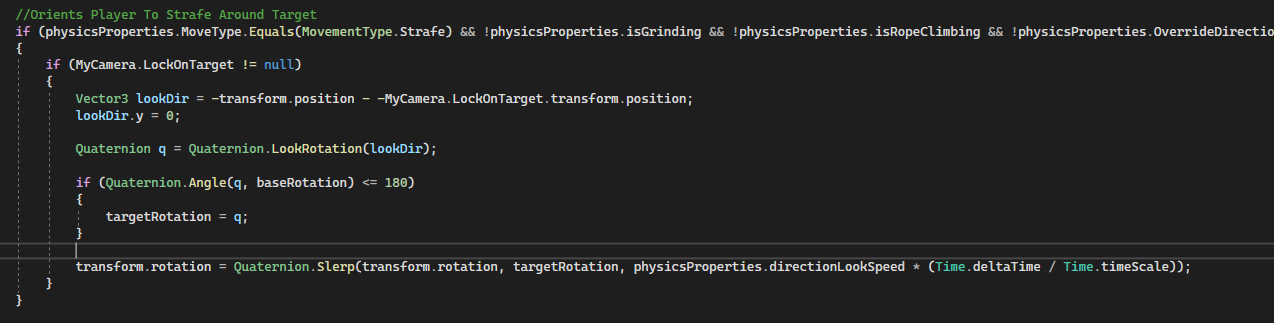
This last bit of code here is very simple. This is for strafing when you are locked on a target for Z targeting. When you are in strafe movement mode, we get the look direction by subtracting our position and the target’s position. However, we flip them to face the direction differently and set y axis to 0 because we don’t want to copy that angle. The Vector3 position is converted to a look rotation so it can be useable for setting our rotation to it. The if statement inside checks for our original angle against our angle to rotate to and snaps the character in the right angle instantly if we go below or equal to prevent any inconsistencies. Lastly, we slerp our rotation angle to get a smoother rotation.
Player Input Management/Keybindings
Coming Soon
Save System
Coming Soon
Gameplay Options Menu
Coming Soon
Cinematic Camera System
Coming Soon
Dialogue System
Coming Soon
Phase 2 Development
Coming Soon